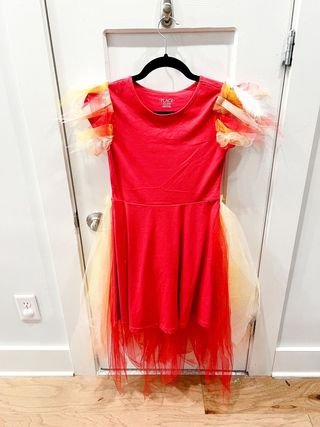
DIY Phoenix Dress
My daughter's current hyper-fixation is birds. She informed me about a month before her birthday party that she wanted to have a phoenix costume for her birthday party. Since we were doing spring break at home this year, it was the perfect time to gather supplies and work on it. Let me show you what we did.
DIY Phoenix Dress | Supplies and Prep
Supplies:
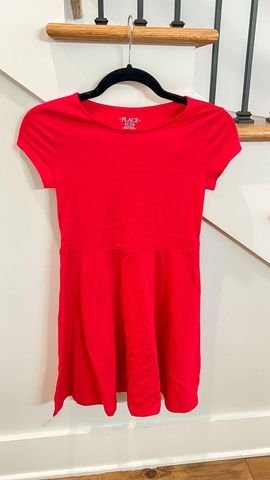
1 red dress
3 yards of red tulle
1 yard of orange tulle (would have bought 2 if they had it)
2 yards of beige tulle
1 yard of yellow tulle
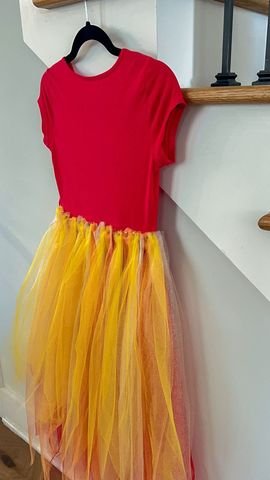
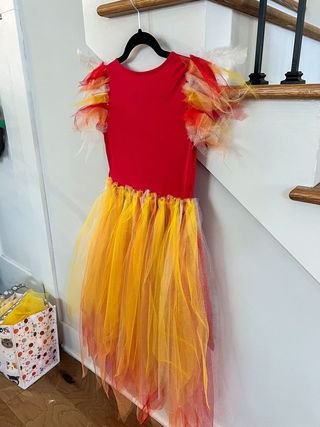
I got a really inexpensive dress from Amazon and 4 different colors of tulle from Joann's. I used the tulle to make a skirt on the back half of the dress creating a “tail”. I also added some tulle to the sleeves.
The first thing I did was cut the majority of each fabric into long strips. I cut the red the longest, then orange, beige and yellow cutting each color group progressively shorter. I started with the red, because it was going to be the base of the skirt. I stacked them on top of each other so there were two pieces of tulle in each stack. I trimmed them a little bit and added a pointed edge at the bottom so it looked a little bit more like a feather and then continued the same process with the other colors.
DIY Phoenix Dress | Building the Dress
I started pinning the red tulle pieces to the back of the dress right along the seam line for the skirt. I started off on each side and then brought in more pieces closer to the center. I tried to make it as evenly spaced and centered as possible. Once I had the base layer of the red, I then started adding in the orange, spreading those out a little bit more because I didn't want the orange to be quite as prominent as the red. I put a section on each edge of the skirt and then added them in every two red sections. Then I started adding is in the beige. I used this color just to add a little bit more neutral tones to the dress, just so it wasn't glaringly like a specific fast food restaurant color palette.
Then I added in the yellow, spacing throughout the skirt. to recap, I started with the longest, which was the red, then orange followed by beige and yellow last being the shortest length of tulle on the very top. The yellow was also the only plain tulle of the bunch, the rest was glitter tulle. That had nothing to do with any preferences, just what was available at the store.
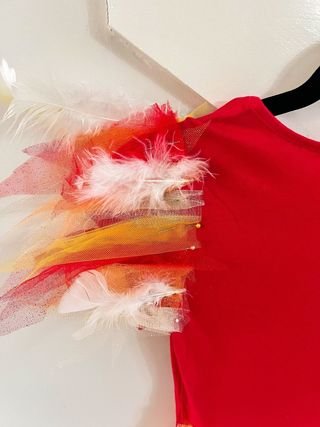
After cutting all of the tulle, I had a little bundle of scraps left over. I decided to use these as well as a few feathers on the sleeves. I took a few of each color scraps, bundled them together, and then pinned them onto the seam of the sleeve. The reason I bundled several pieces together instead of just using one piece at a time is because I wanted to make the color more vibrant. I did this on both of the sleeves, all the way around except for right under the armpit because I didn't want it to irritate my daughter. No one should have sensory overwhelm at their birthday party. Then, I added in a few feathers and pinned everything on. I had everything pinned at this point because I needed to figure out where everything was going and then I would sew it. I didn't end up using as many feathers as I'd pinned on, which was totally fine. I had my daughter try it on once everything was pinned (it was a definitely a trial getting her into it with all of the pins). I then started sewing.
DIY Phoenix Dress | Sewing and Finishing Touches
There was a little bit of trial and error when I started sewing this. I tried to sew the tulle on top using red thread and I would not suggest doing this. Frankly, it looked terrible. Also, because I was sewing with the tulle on top, everything was getting bunched, and I ended up sewing parts of the skirt to itself, which was not great. I pulled all of the red thread out and went back using the yellow thread. I also sewed the skirt inside out so I was sewing on the inside of the skirt instead of on top of the tulle. Sewing it this way was SO much easier.
I did the same thing for the sleeves. Once I got the sleeves all done, I started adding the feathers. I found hand sewing the feathers on was so much easier than trying to do it on the sewing machine. To finish everything up, I trimmed some of the tulle that was above the seam line, just so it looked more even and nothing was sticking out funny and it was done!
I've said it before and I will say it again: I'm not a seamstress. I have very basic sewing skills just enough to be able to do stuff like this, but it turned out alright even with my minimal sewing skills. My daughter absolutely loves it. She's thrilled about it. She has informed me she needs a tiara to match it, so we'll see if I end up doing that. I've linked everything I could below.


