
Cardboard Elephant Heads
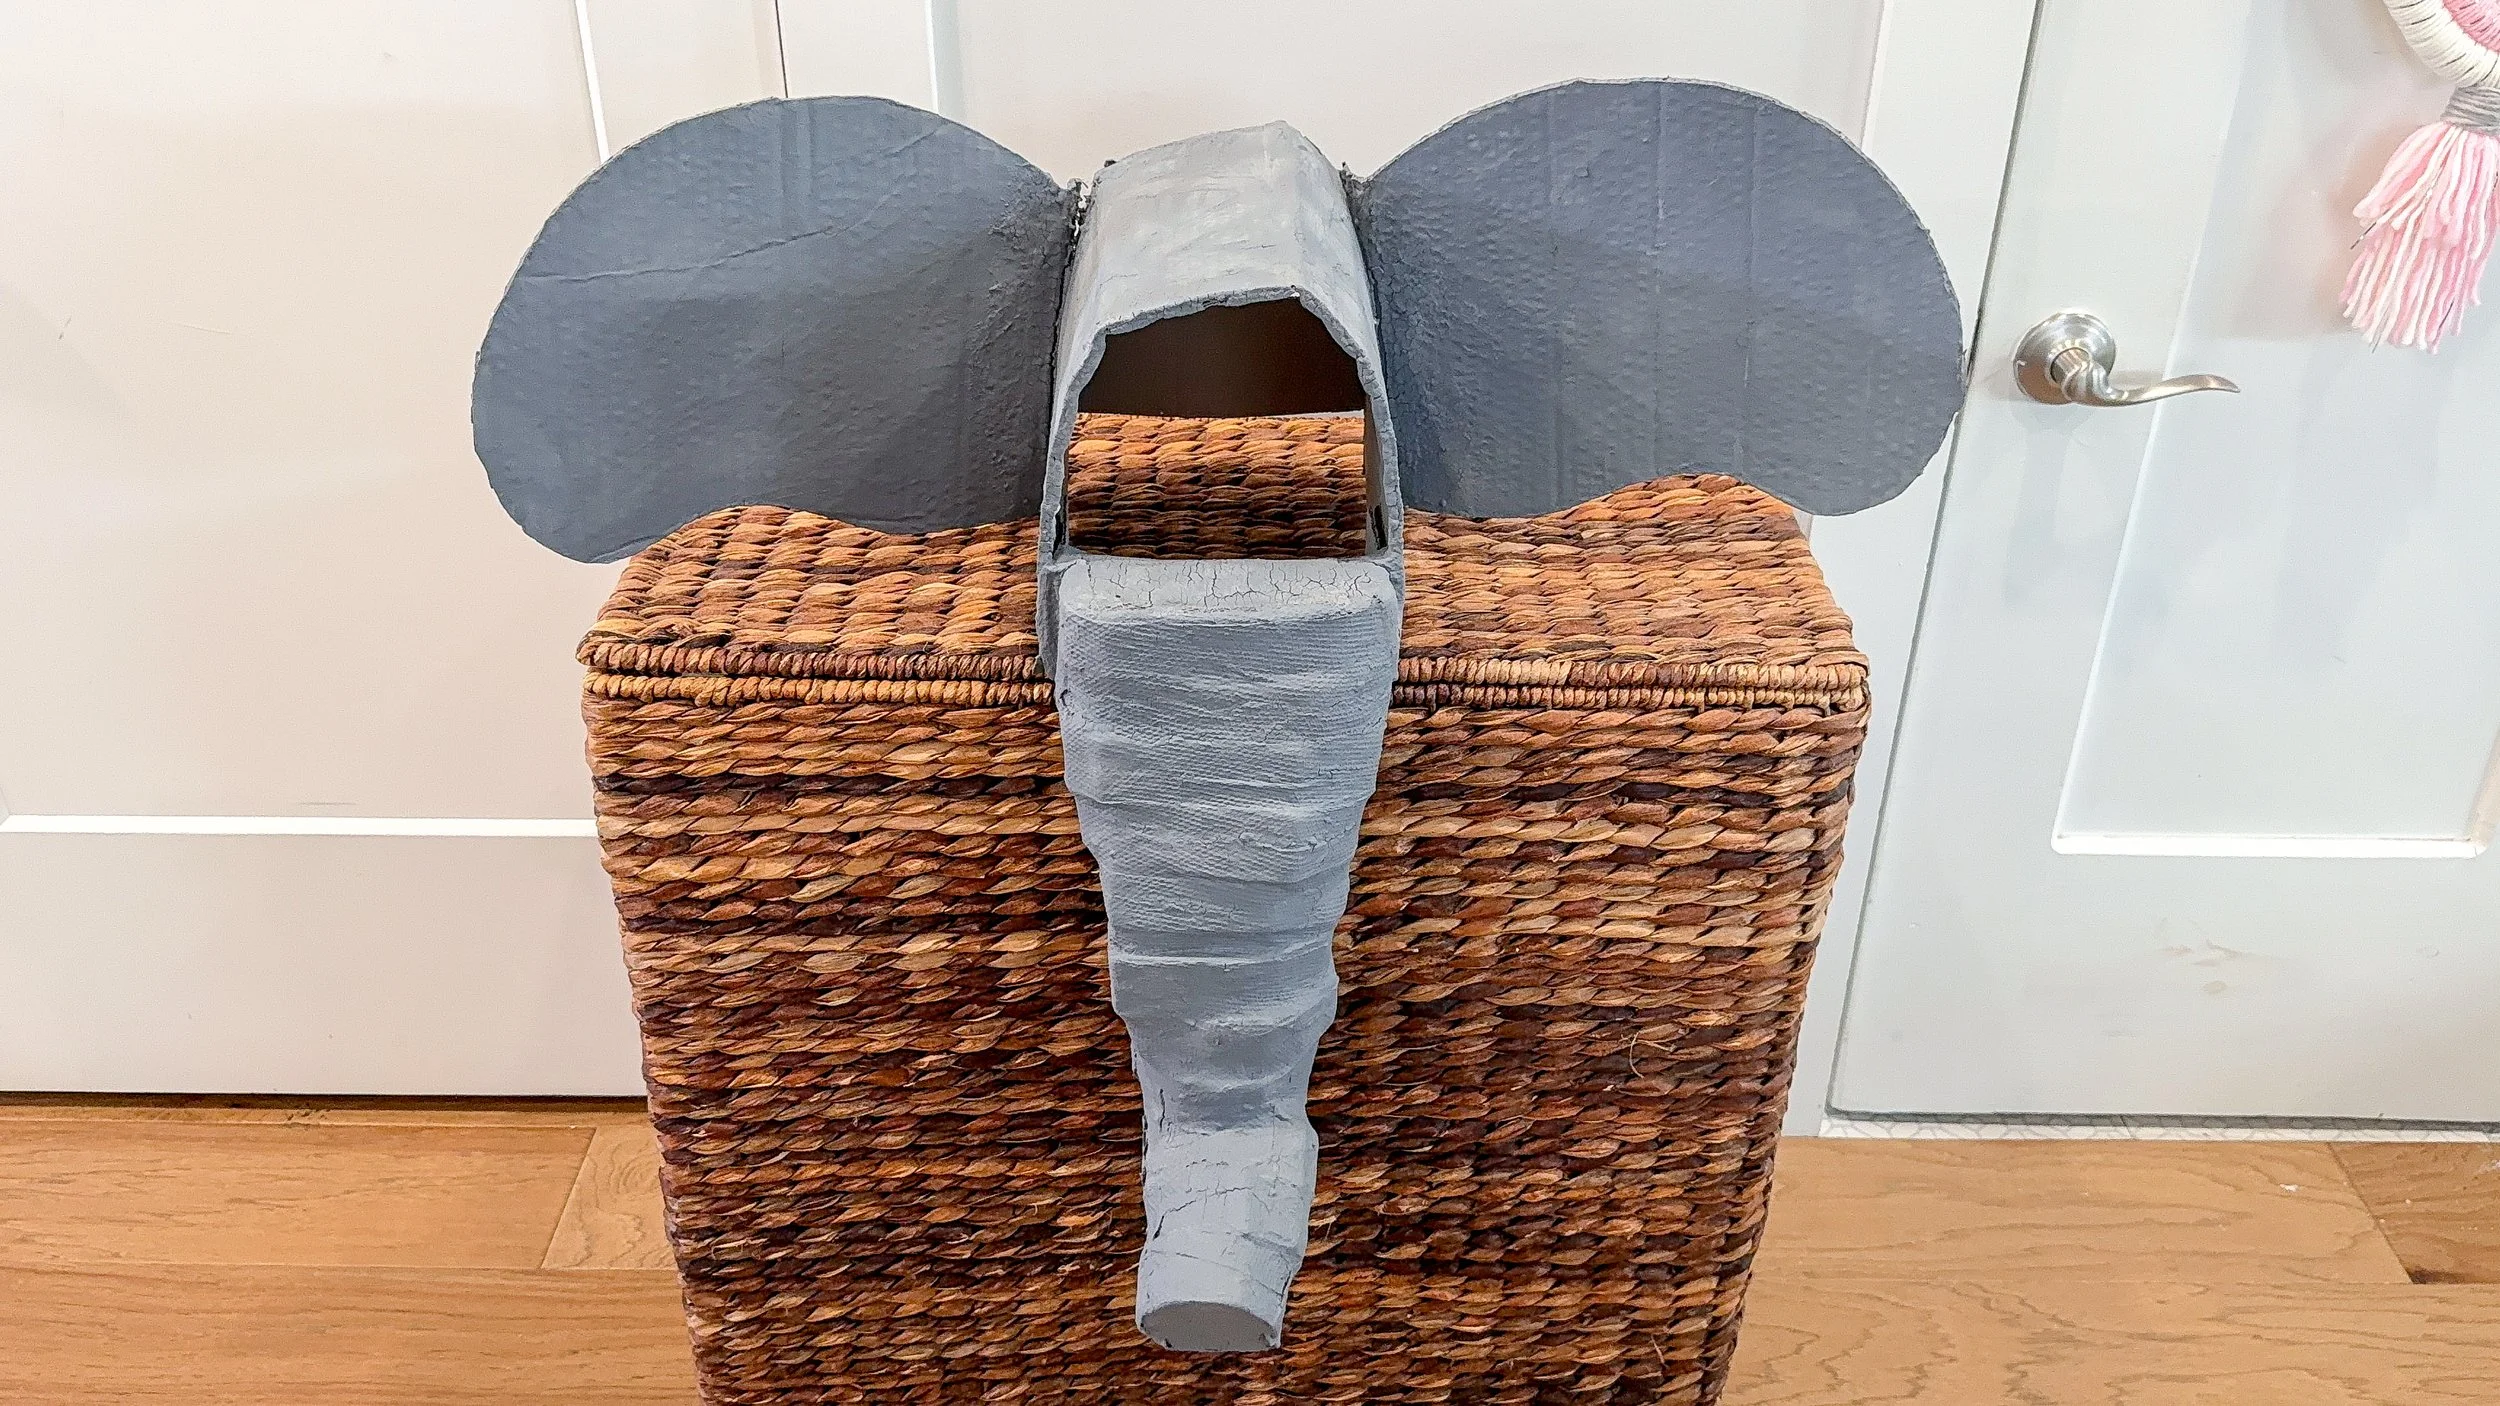
Today I'm going to show you how to make an elephant helmet. I know it sounds random, but my daughter’s elementary school asked me to help with the costumes for the school musical. I made elaborate ocean scenery last year for Finding Nemo and I am making the elephant costume heads for this year's performance of The Jungle Book. My daughter is a separate elephant so this isn't her costume, but I made them for the rest of the "elephant herd". The school requested 6 total and wanted something where you could see the kids' faces, but was more elaborate than a headband with ears. I wasn't finding any tutorials online of what we were looking for so I kind of had to make up my own process. It ended up working out SO great so let me show you what I did.
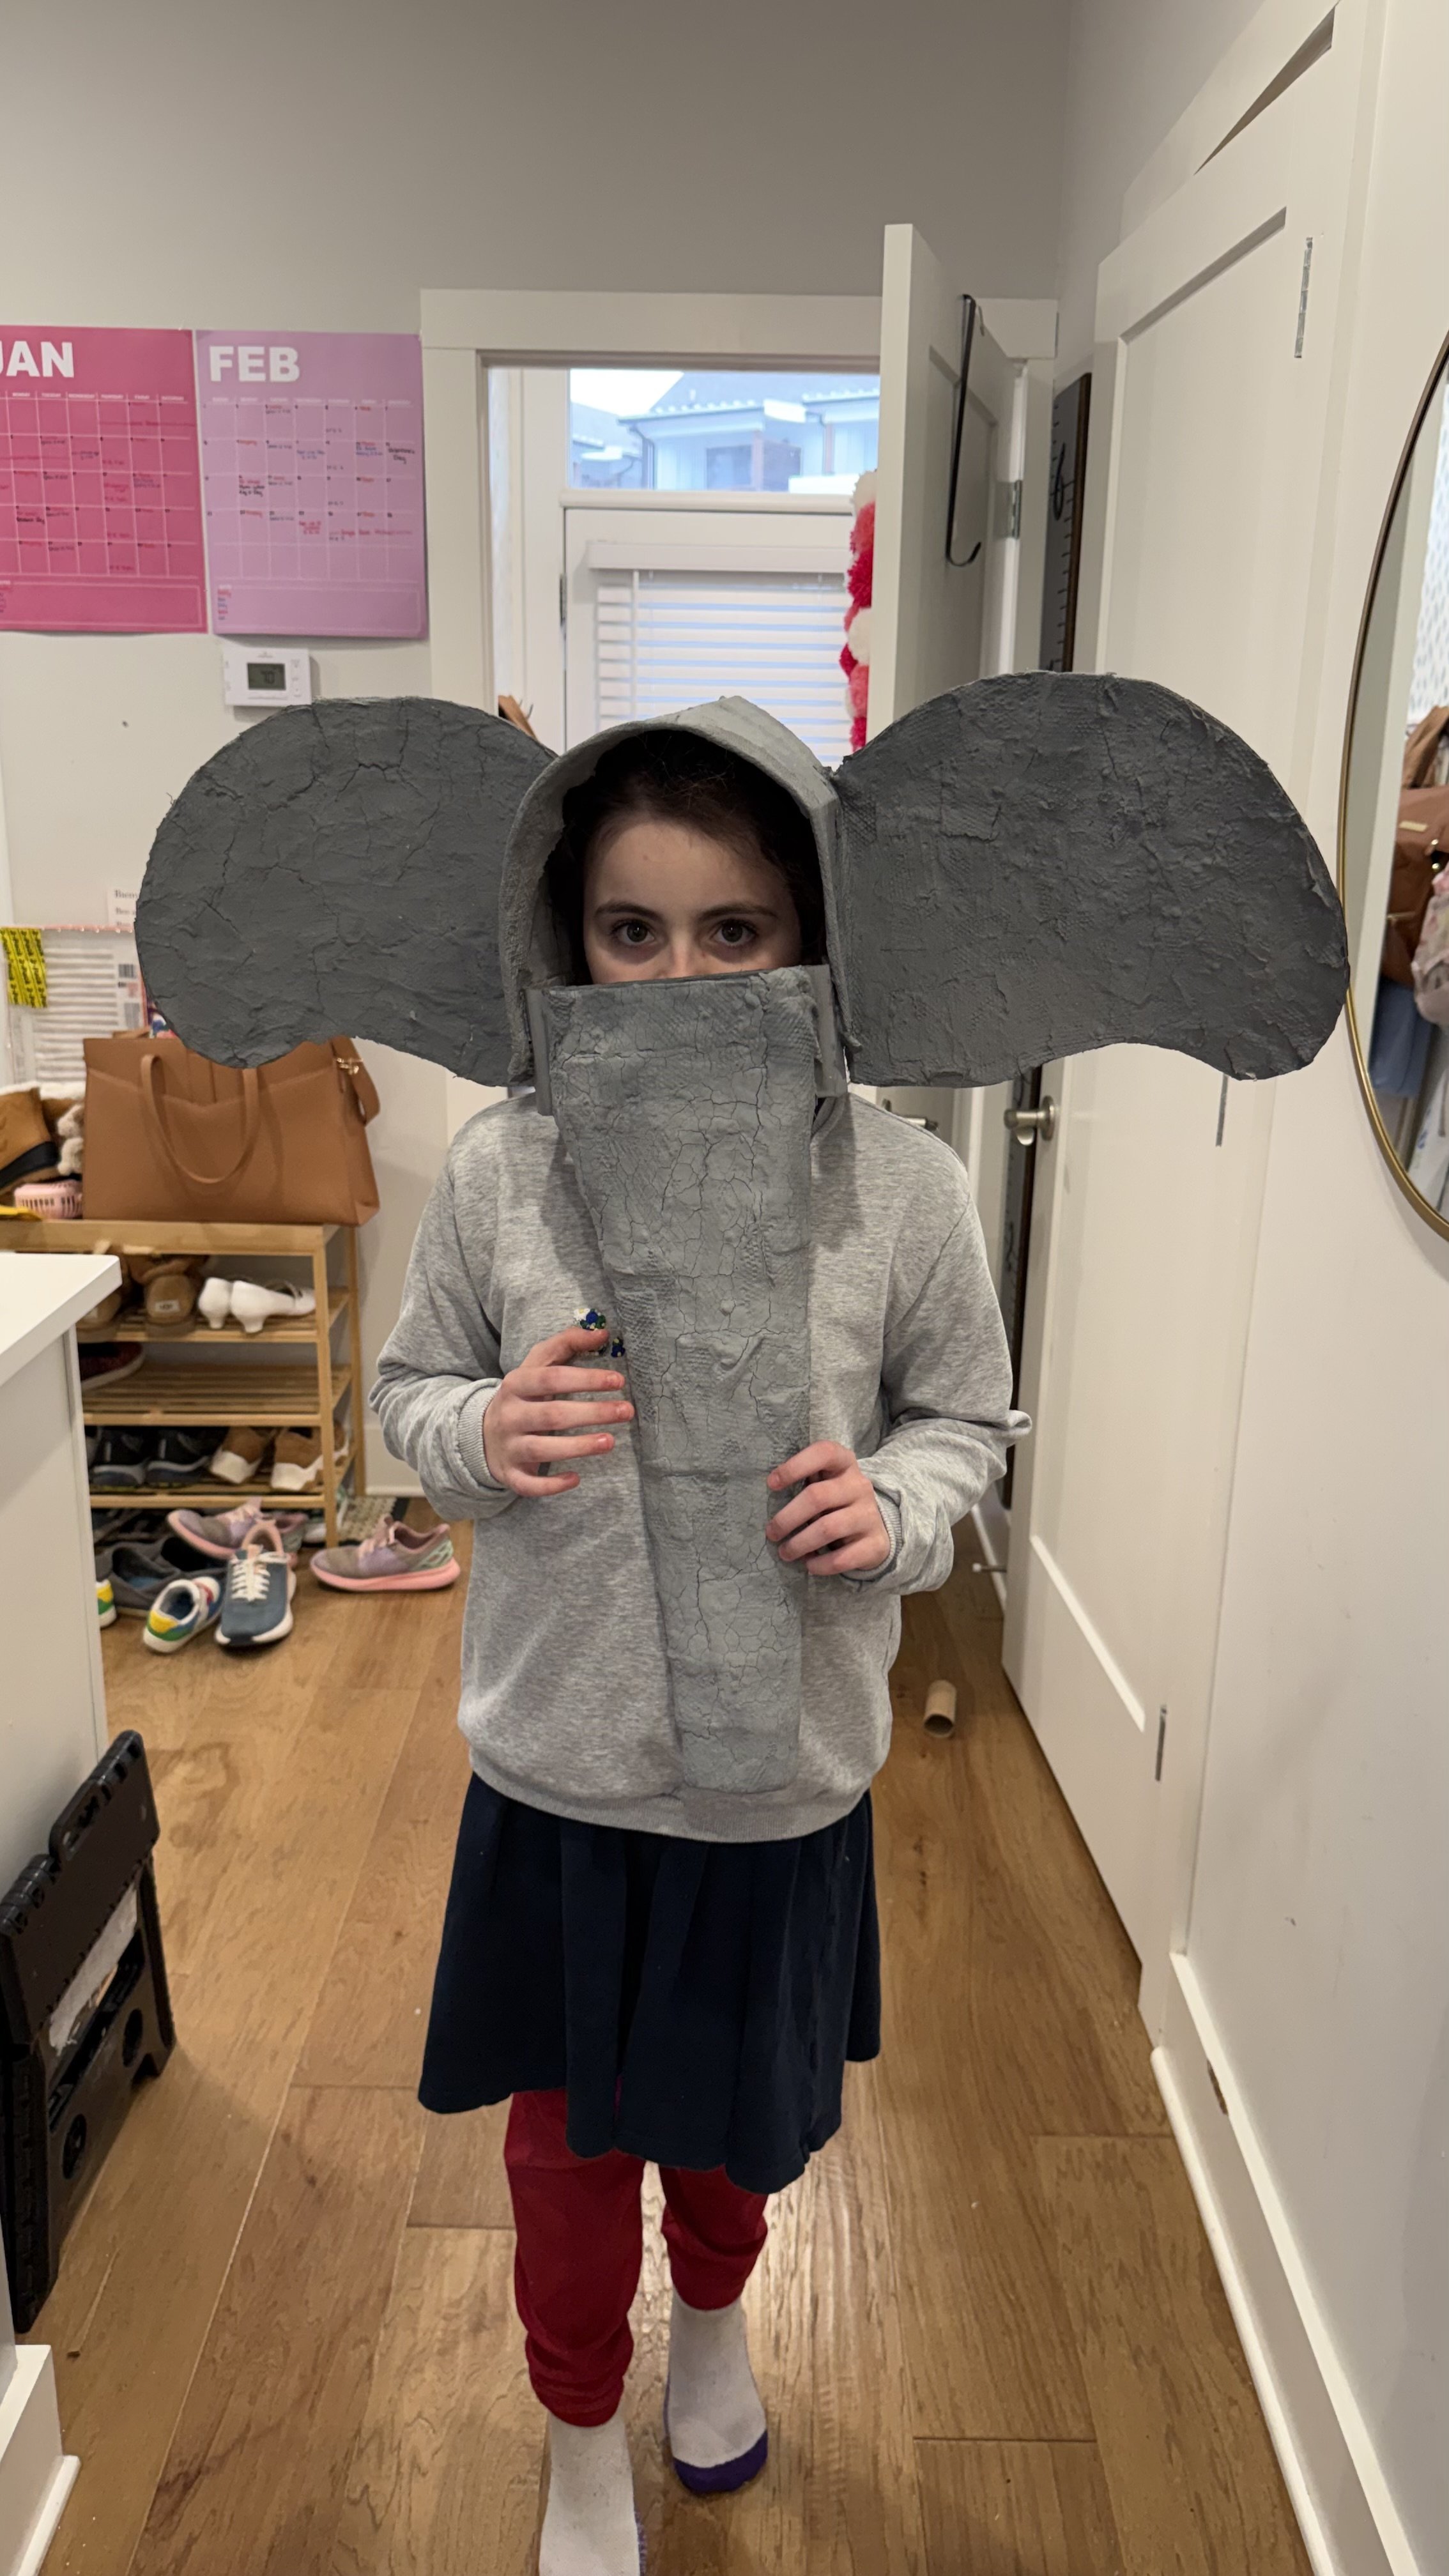
Cardboard Elephant Heads | Trunks
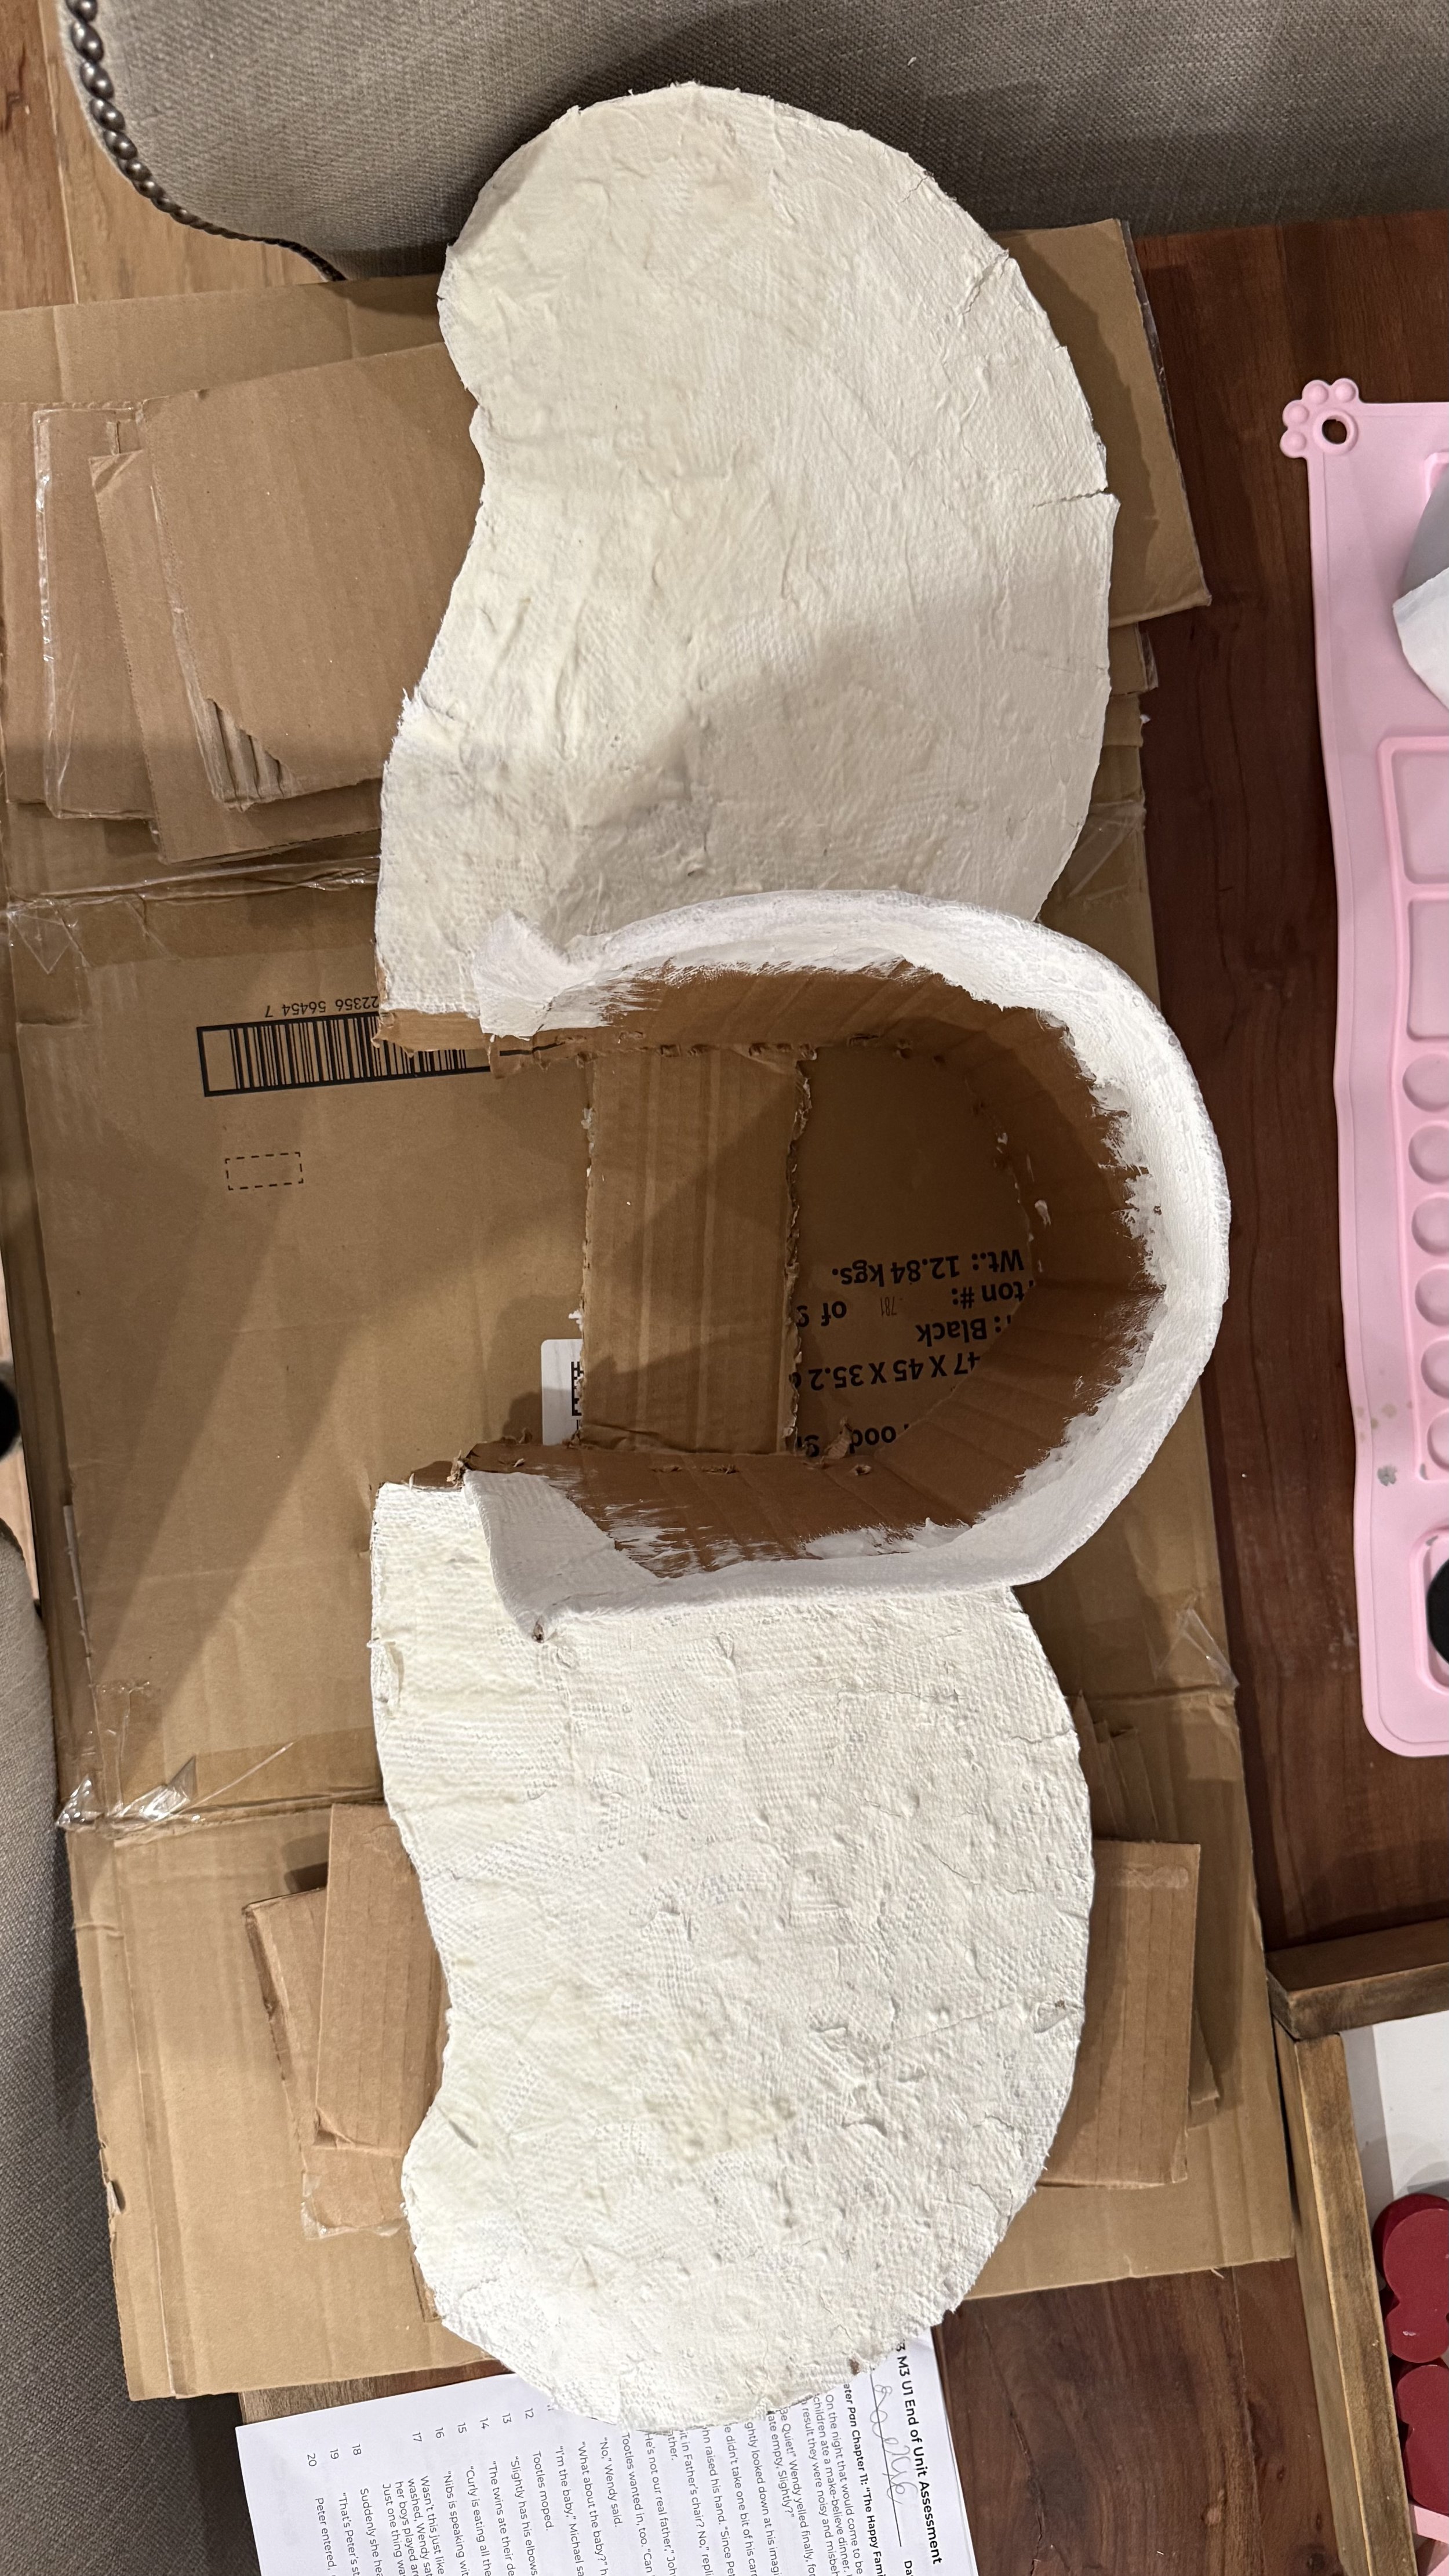
To start, I needed to make a trunk. I outlined the shape I wanted in cardboard and cut it out. Then, to actually make it 3D, I took strips of cardboard and hot glued them to that original shape. I bent the ends of each strip of cardboard so they gave that 3D effect. I repeated this all the way down the trunk, varying them in size and height to give texture and depth to each trunk. I wanted each to look different so while I was adding the pieces, I made sure that I left a few gaps so I could go back and fold each trunk into different shapes. I wanted each elephant head to have personality and be unique.

I decided to papier-mâché without newspaper and instead used paper towels which work just as well and are more accessible to me. In some instances, paper towels wouldn't be ideal because they have texture that will show up, but I wanted texture for these trunks so it was perfect. As many of you know, I have a wheat allergy, and so everything I eat is gluten-free. When I was making the paste, I decided to use gluten-free flour. It was a little more expensive, but this way I was able to feel confident knowing I wouldn't have a reaction.
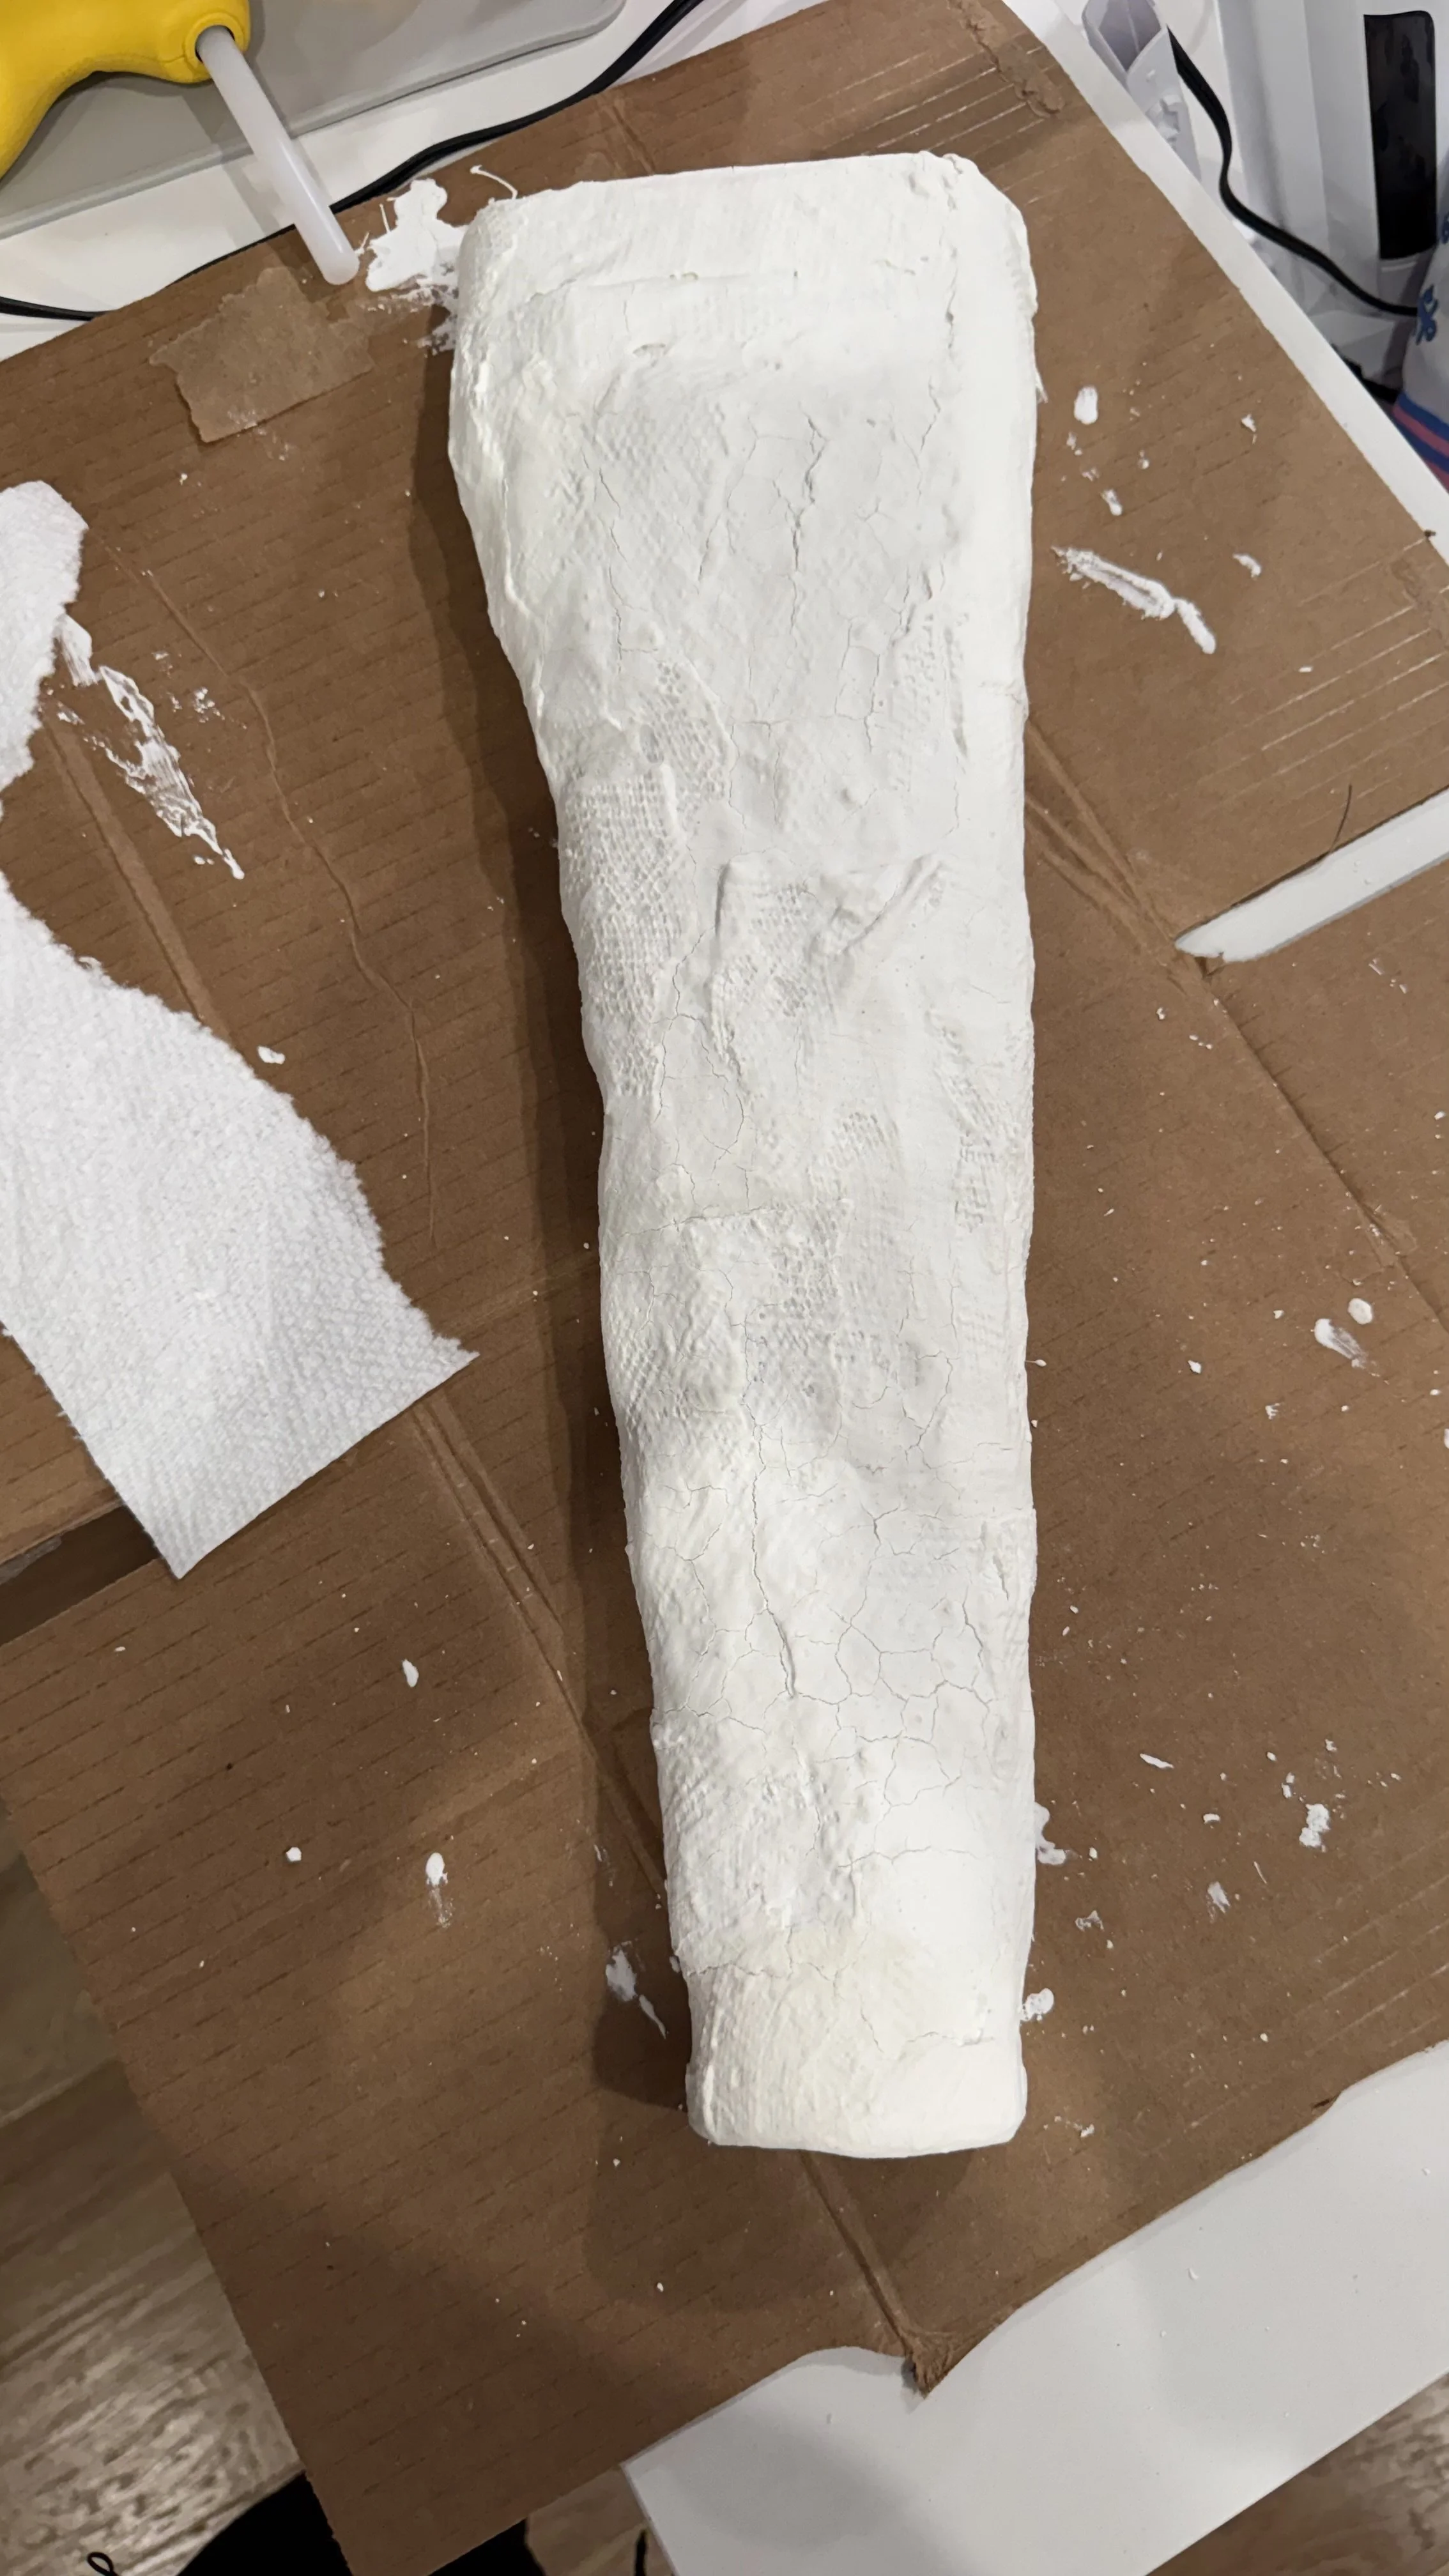
When working with papier-mâché, you make the paste with a one-to-one ratio. However, gluten-free flour tends to be denser than regular flour, so I had to play with it a little bit until I got that right pancake-batter consistency. I ripped the paper towels into strips, dipped them into the paste and proceeded to lay them on top of the trunk. I continued the process by painting over the trunks with a paintbrush in order to get the trunks to be the shape and style I wanted them to be. I used a lot of buckets and anything I had on hand to stabilize all parts of the trunk. The whole thing was pretty heavy, especially when wet, so I had to work hard making sure every part was secured so it wouldn't break while it dried out and hardened over multiple days. After drying, I was delighted to find that all of the trunks didn't move or lose their shape.
Cardboard Elephant Heads | Ears
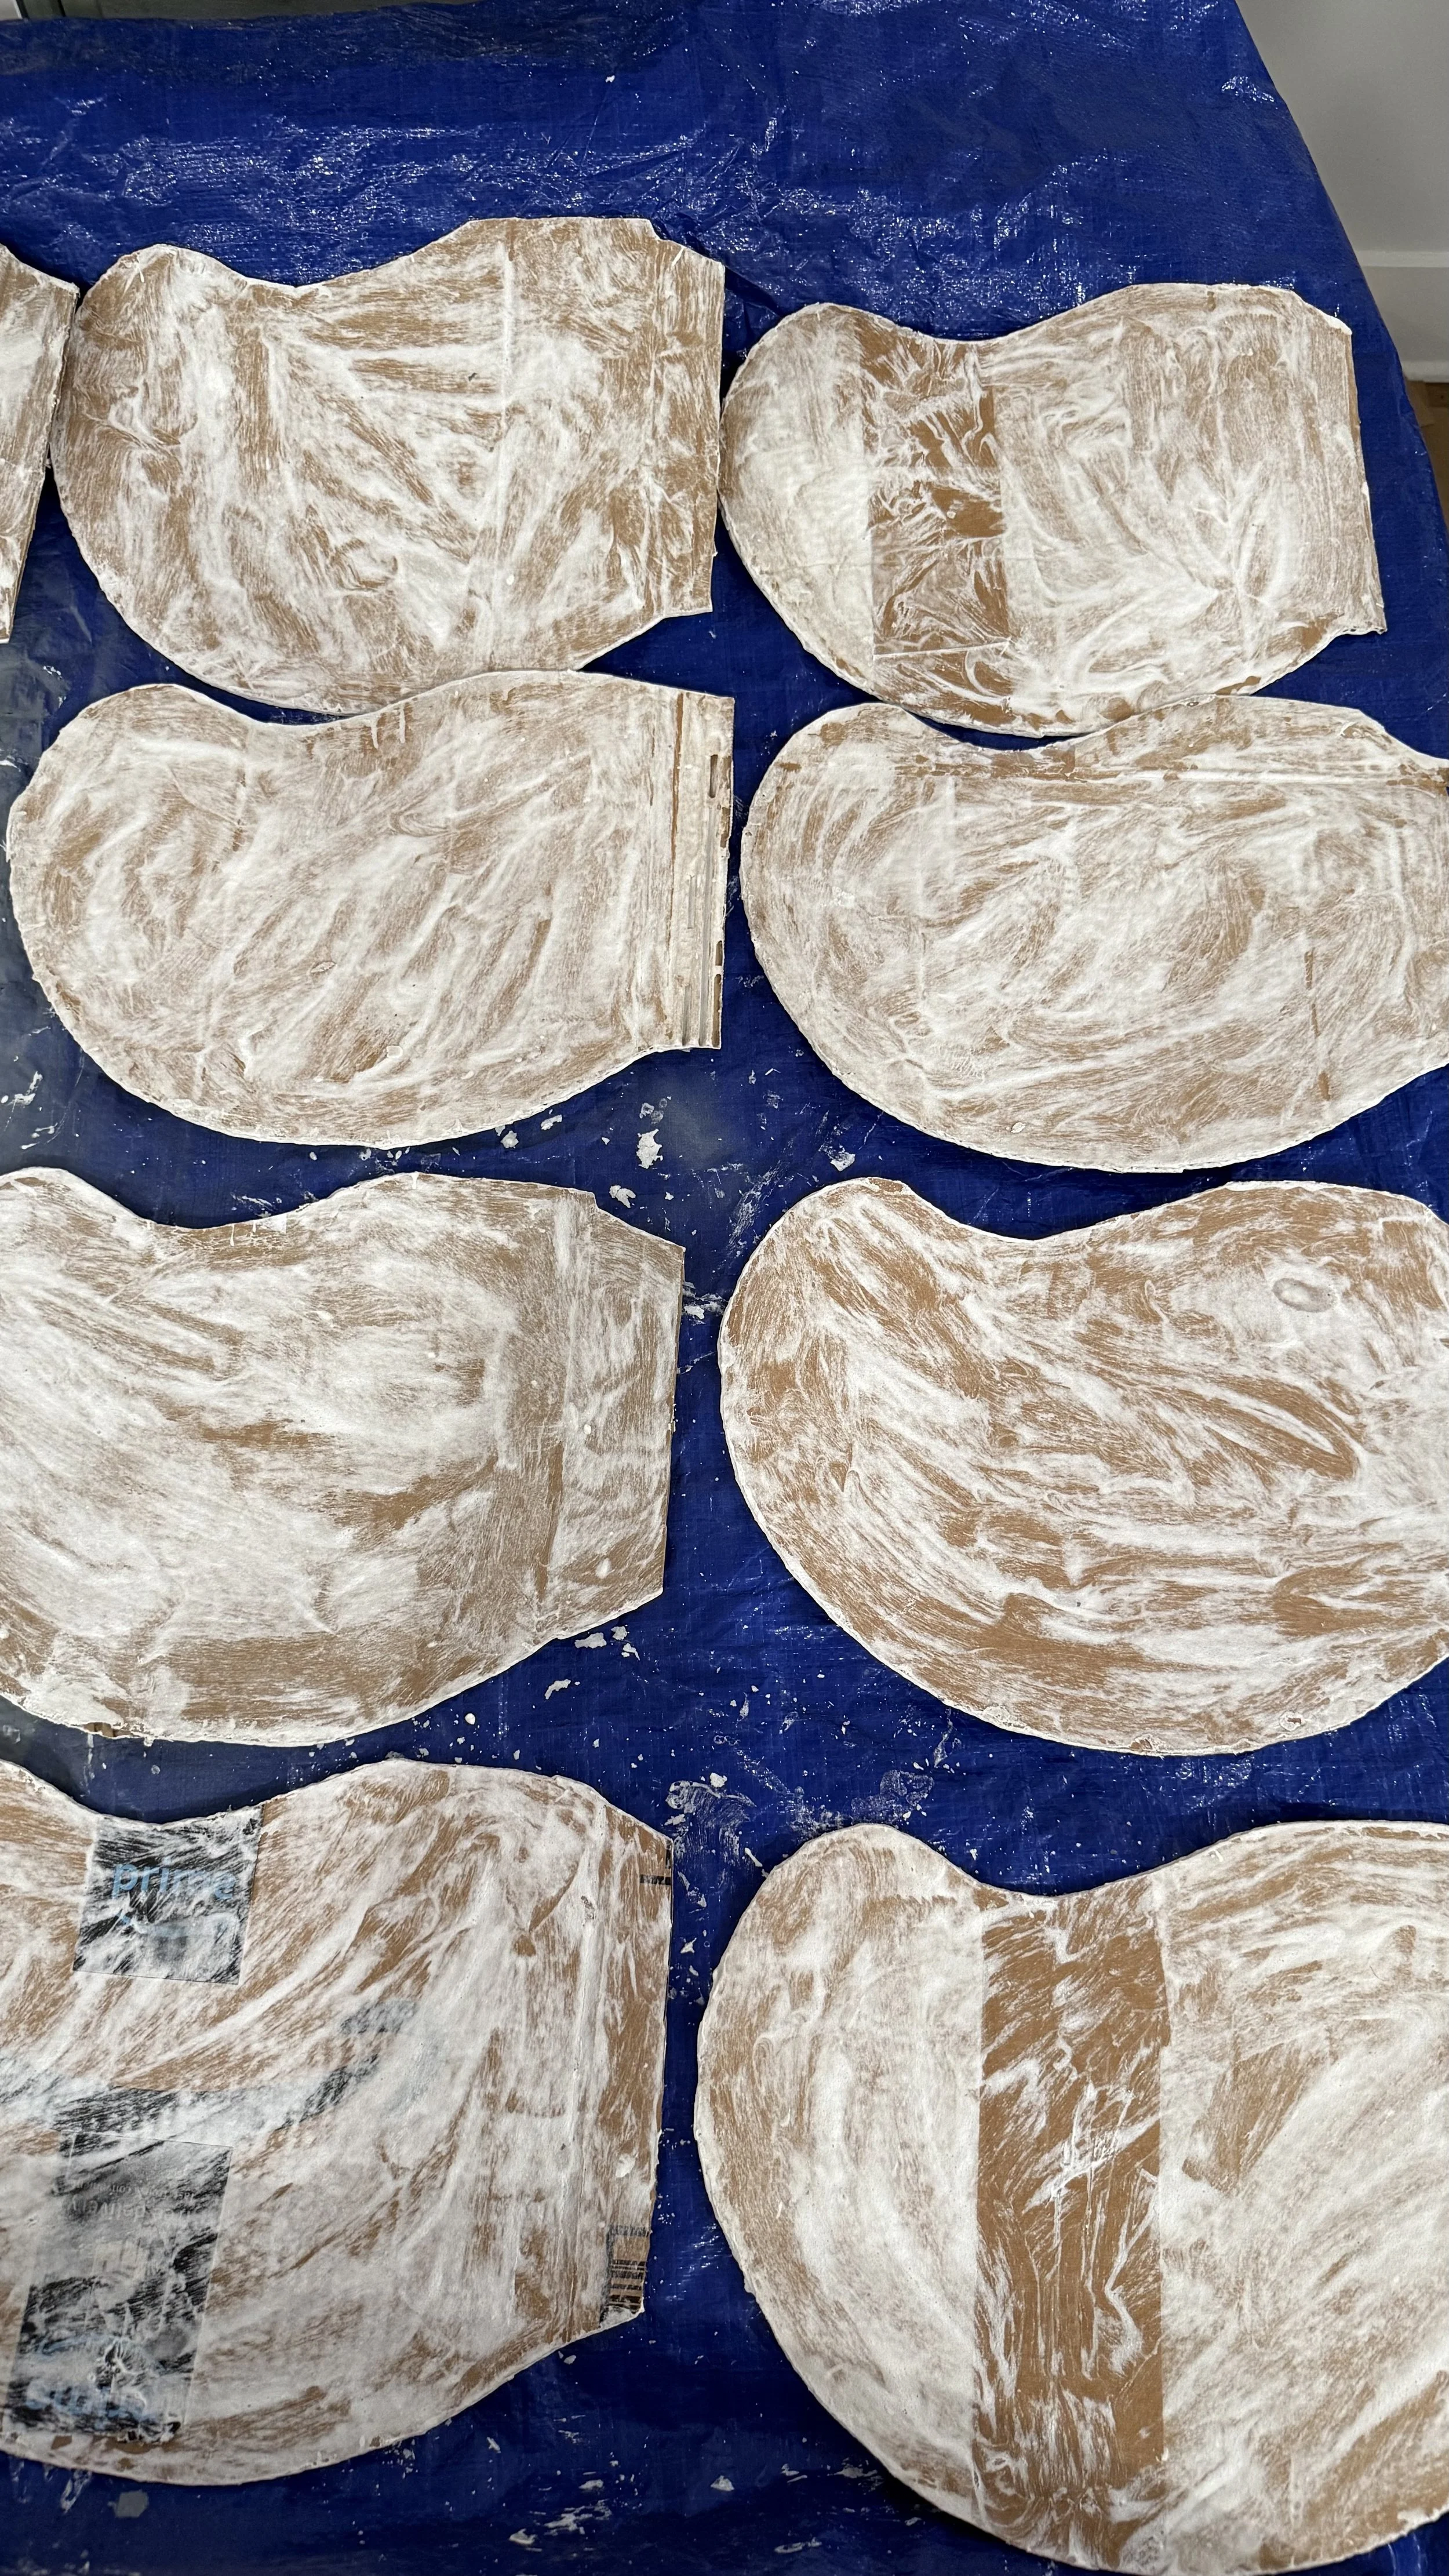
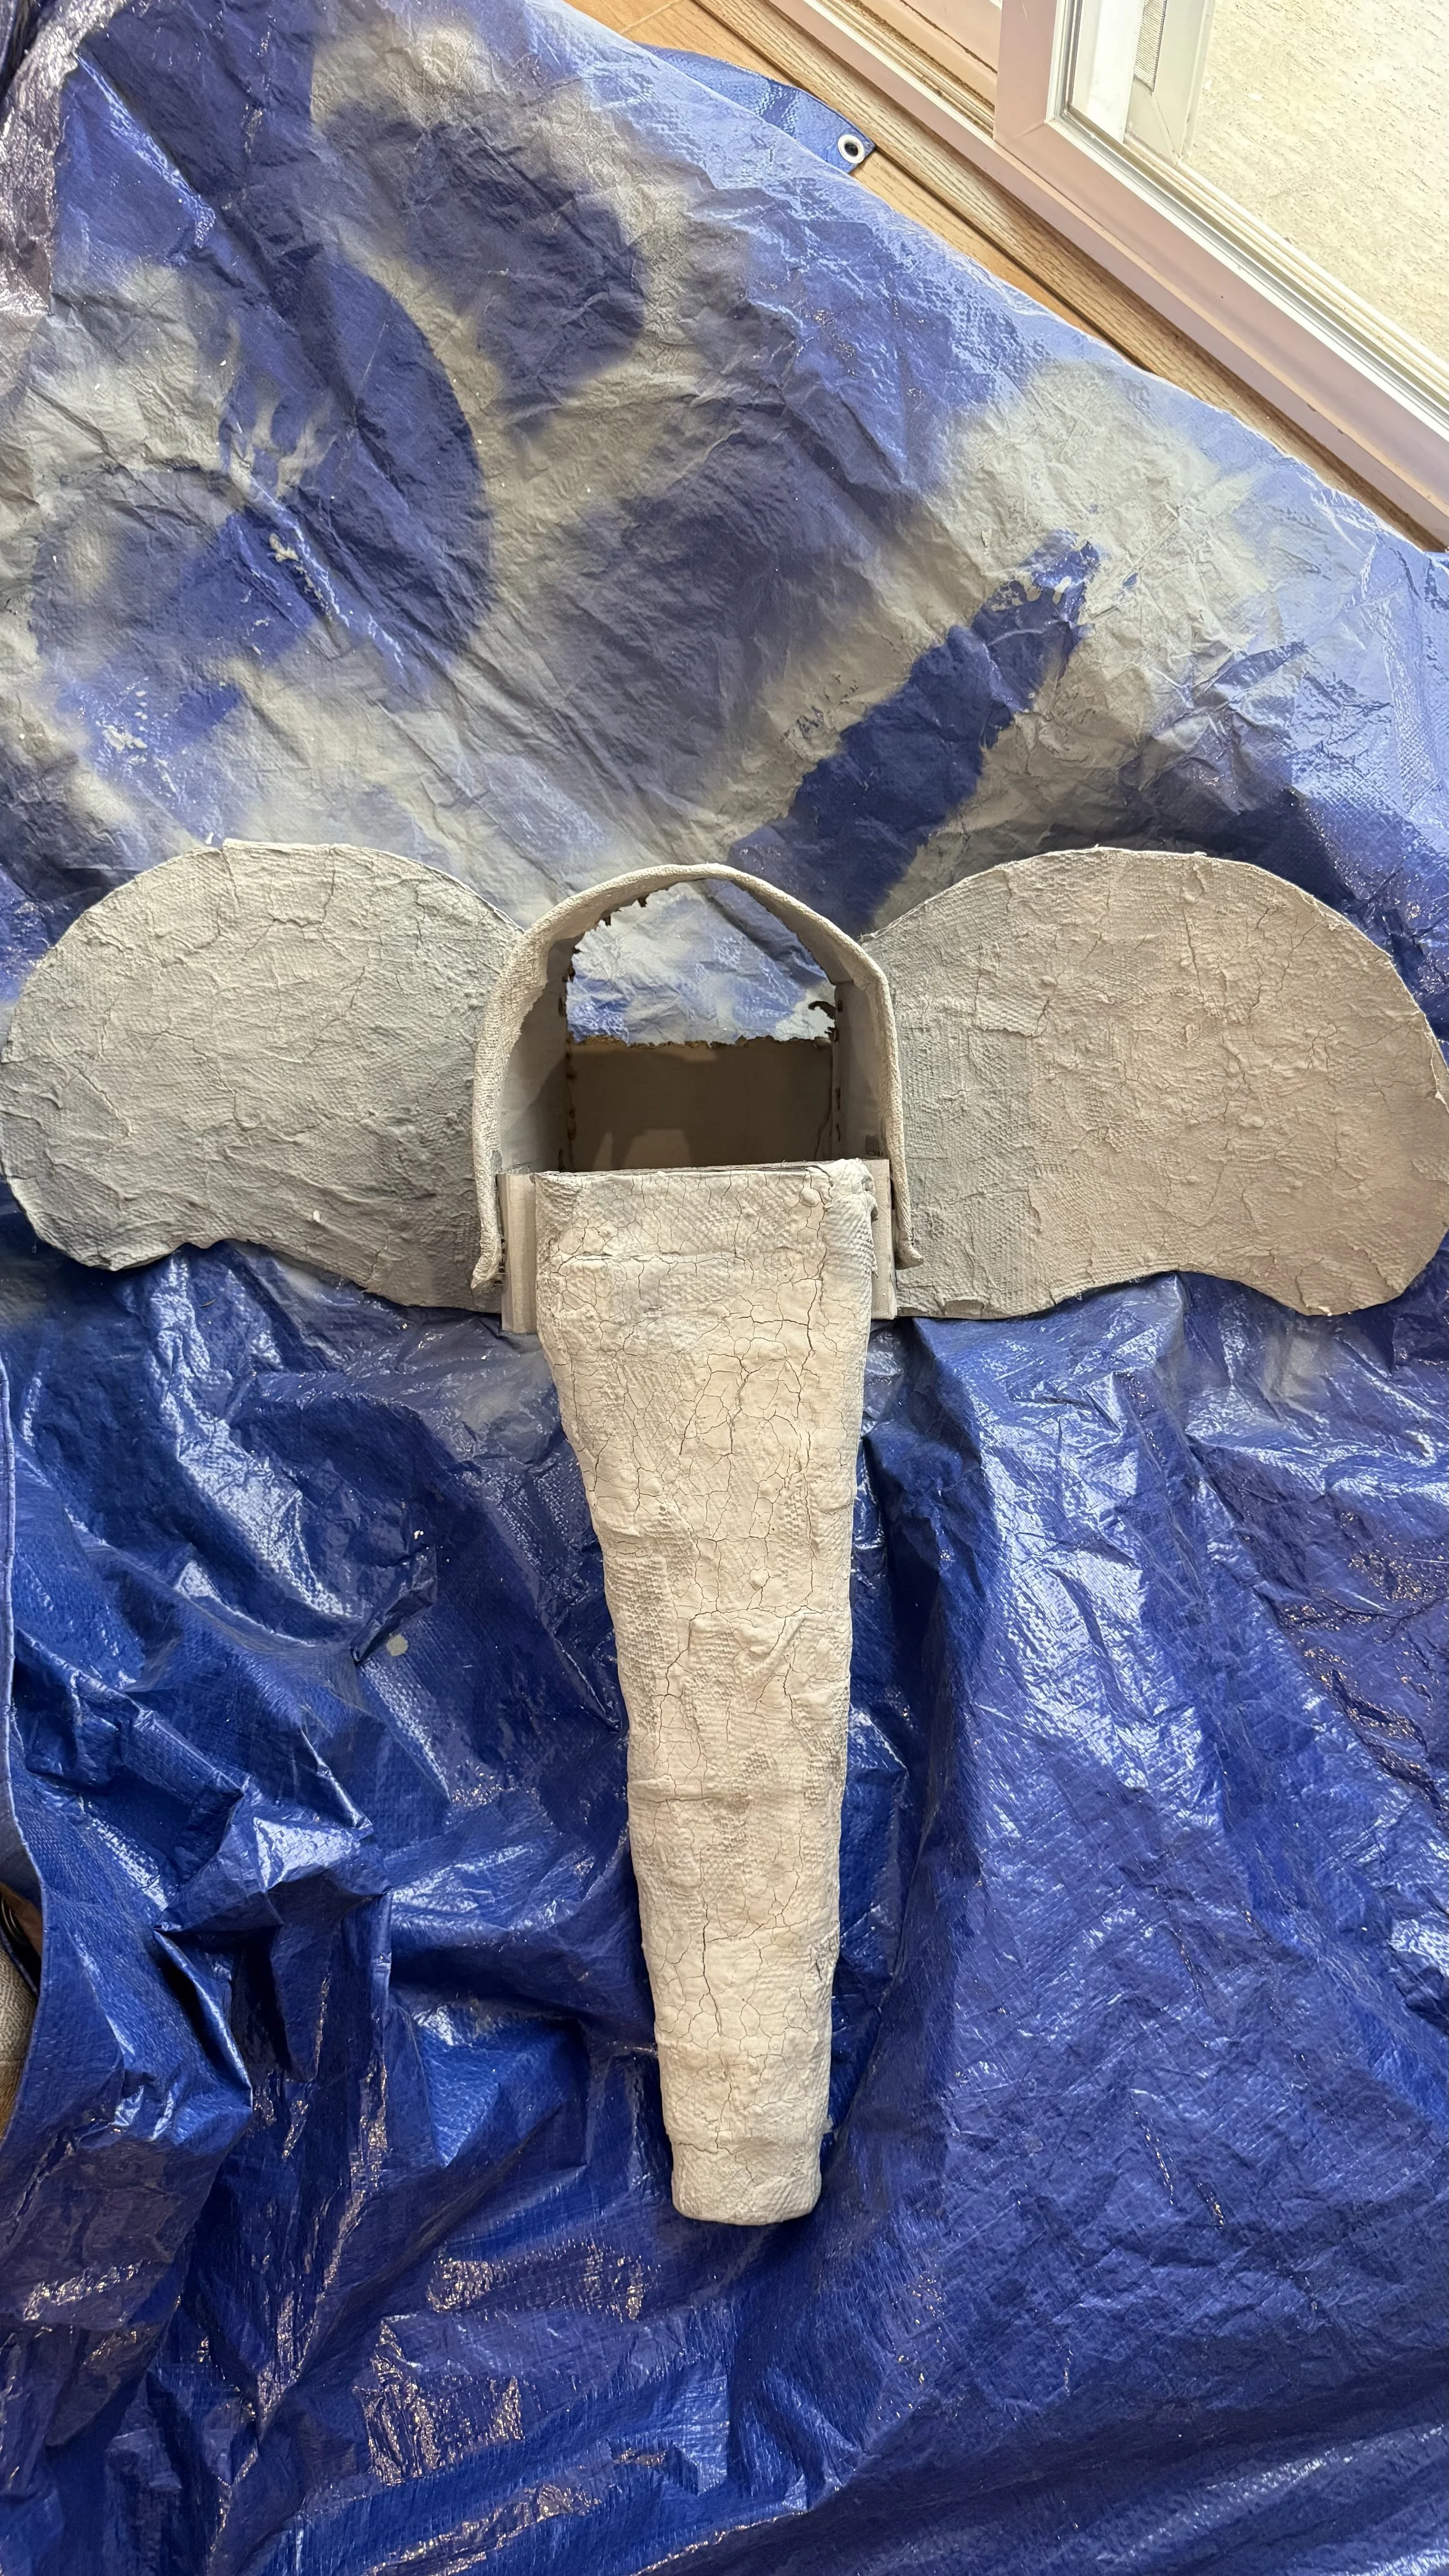
The next step in the process was the ears. This took a lot of trial and error because when I originally made the ears, I made them really big, almost adult sized. When I put them on my daughter to test I realized they were definitely not kid sized so had to play around until I finally got the right size and shape appropriate for elementary schoolers. Since I was making 6 full heads, I cut 12 ears out of cardboard. I found it was easier to use thin cardboard rather than the heavy duty stuff. I wanted the same texture that I had for the trunks so started the papier-mâché process. However, I discovered that using papier-mâché on the ears made them way too heavy causing them to flop down and wouldn't end up looking right. So instead of full on apier-mâché on the ears, I instead used the paste and brushed it onto the ears first around the edges to keep it from looking like cardboard. Then I brushed the paste onto the actual cardboard on the front and the back, and let them fully dry. This gave them the same texture as the trunks without weighing them down.
Cardboard Elephant Heads | Painting

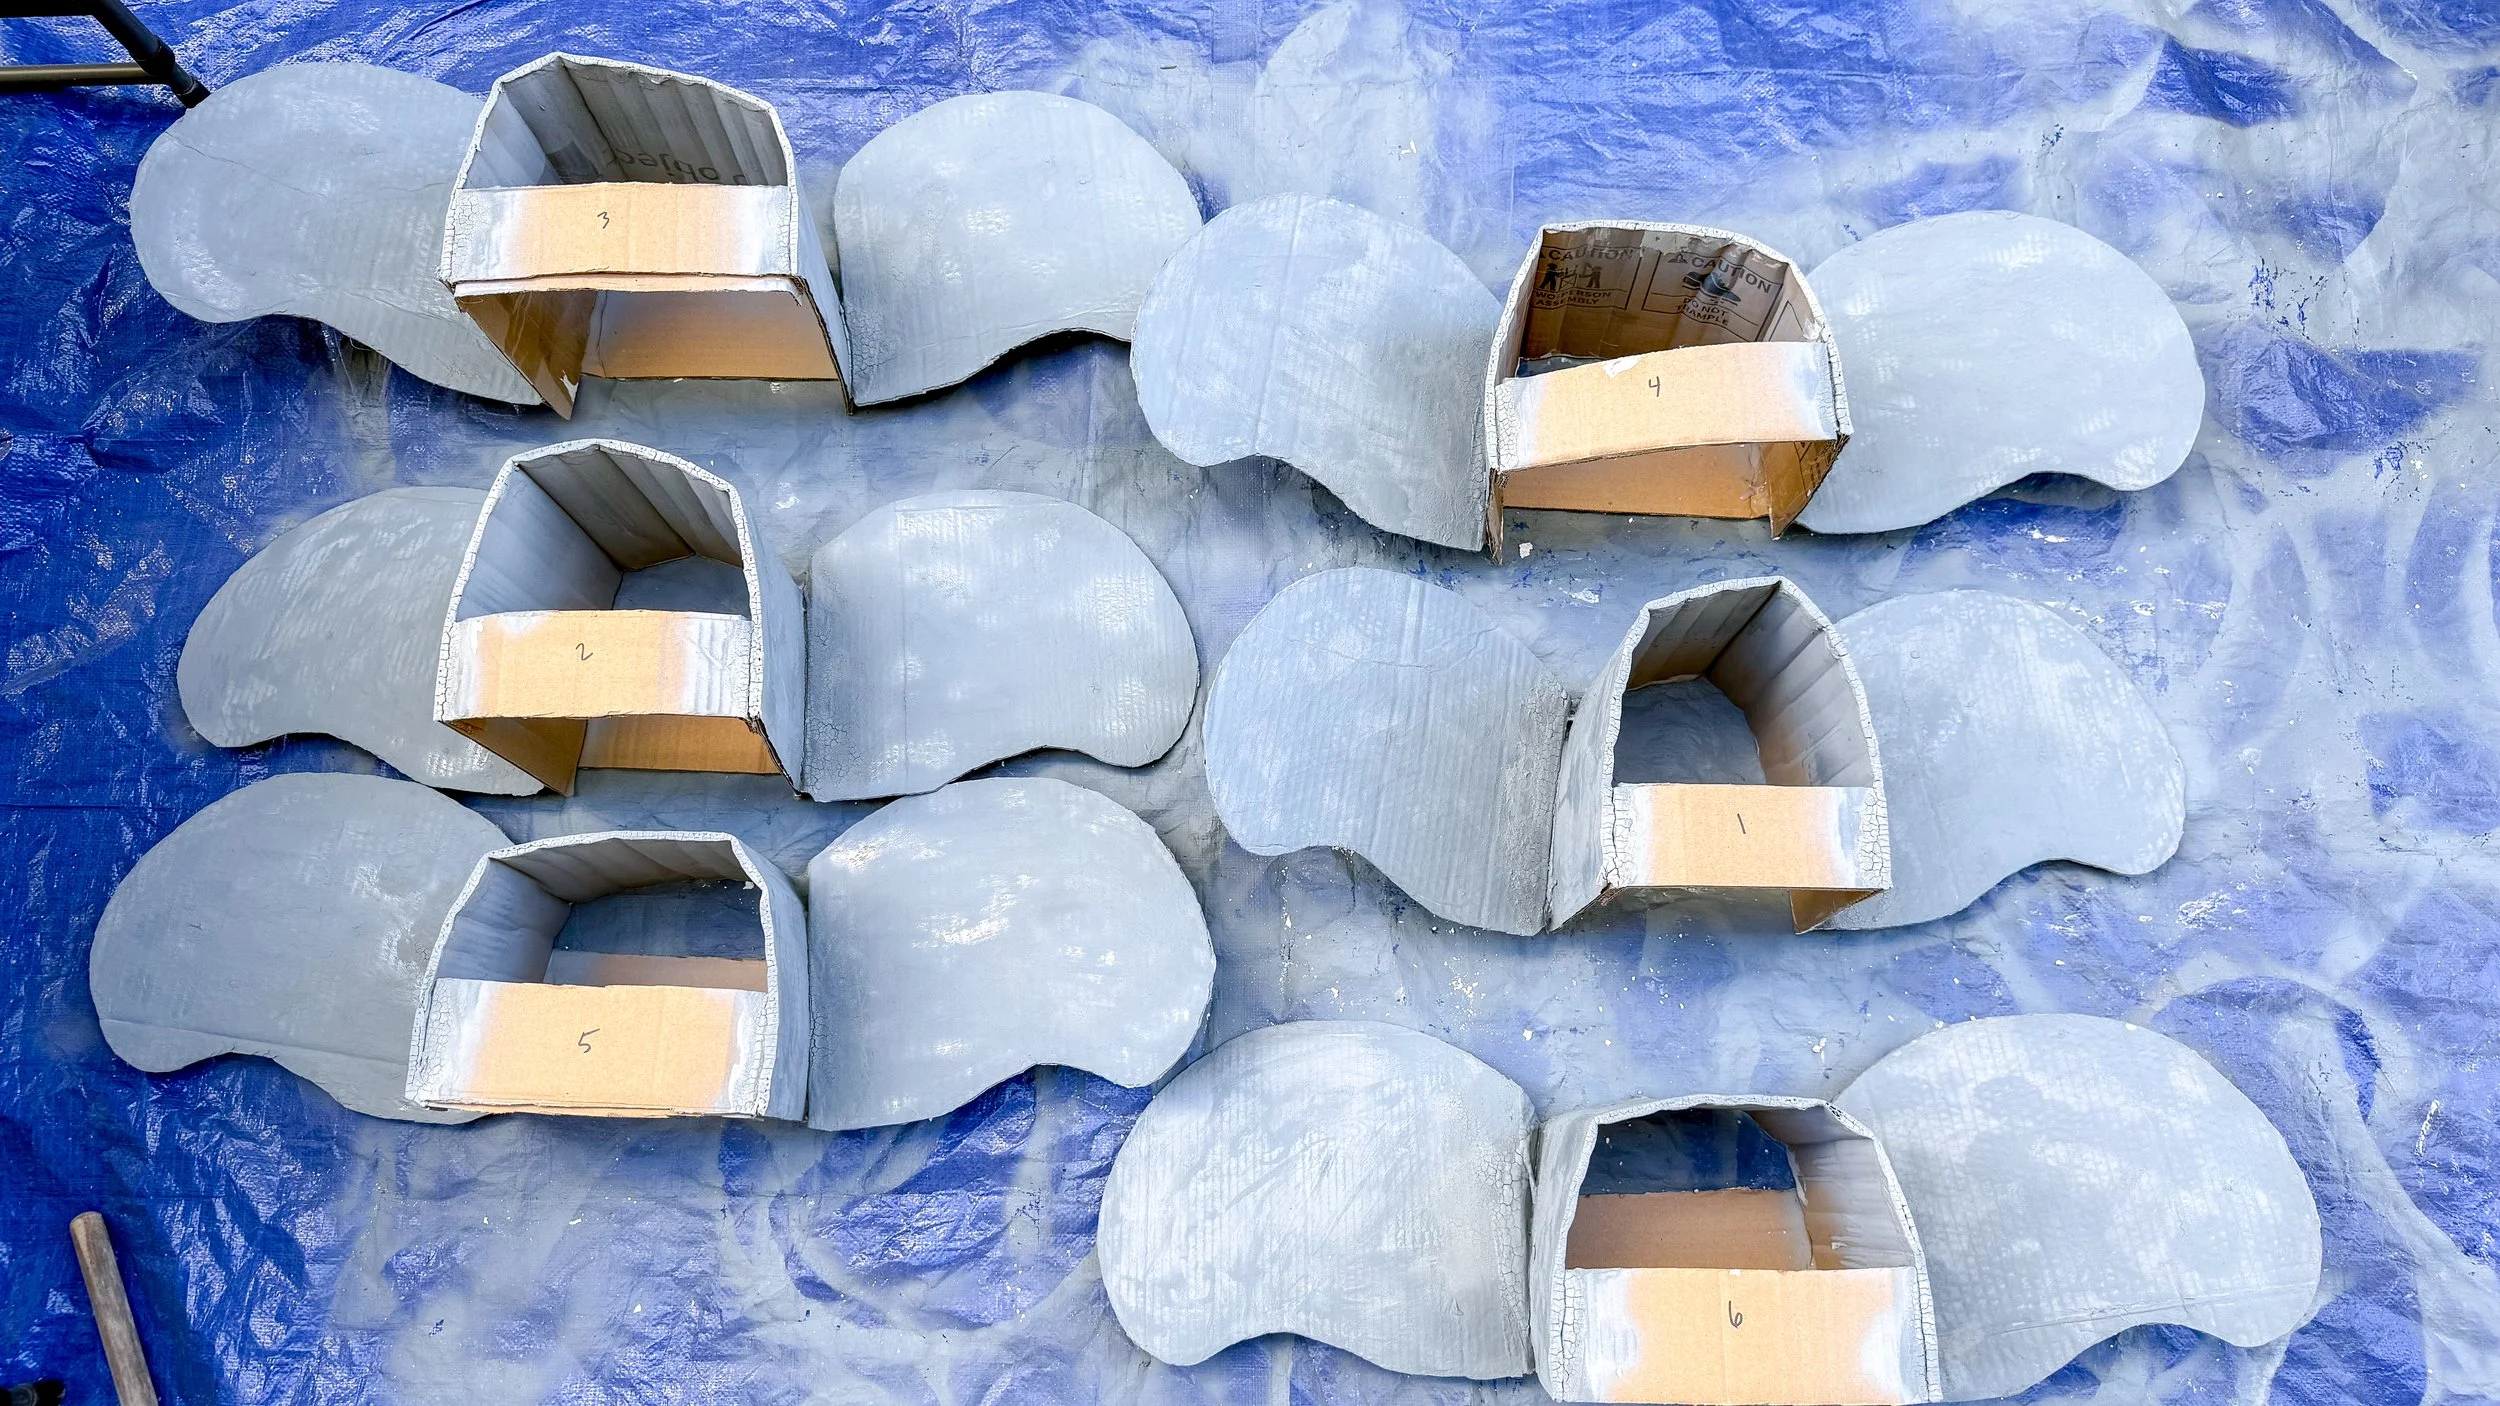
Once everything was dry, I used a spray paint primer and sprayed everything thoroughly. I did multiple coats on the ears and the trunks because otherwise it wasn't getting full coverage. I really liked this primer because it was a matte finish. This helped later in the process because when I was touching up or securing things with duct tape I was able to cover up the shininess of the duct tape so everything blended pretty seamlessly. We ended up having to do repairs during the play. In some instances, we actually needed to use duct tape, and the duct tape is shiny as opposed to the matte of the spray paint. But since it's a primer, it went right over the duct tape. When I was doing the prototype, I discovered I needed to paint stuff in sections, otherwise the ears and the trunk got wet again adding too much pressure to the headpiece and everything started to sag. So painting first, especially the ears and the trunk before attaching them to the headpiece, really helped with making sure everything was stable and look good at the end.
Cardboard Elephant Heads | Head Pieces
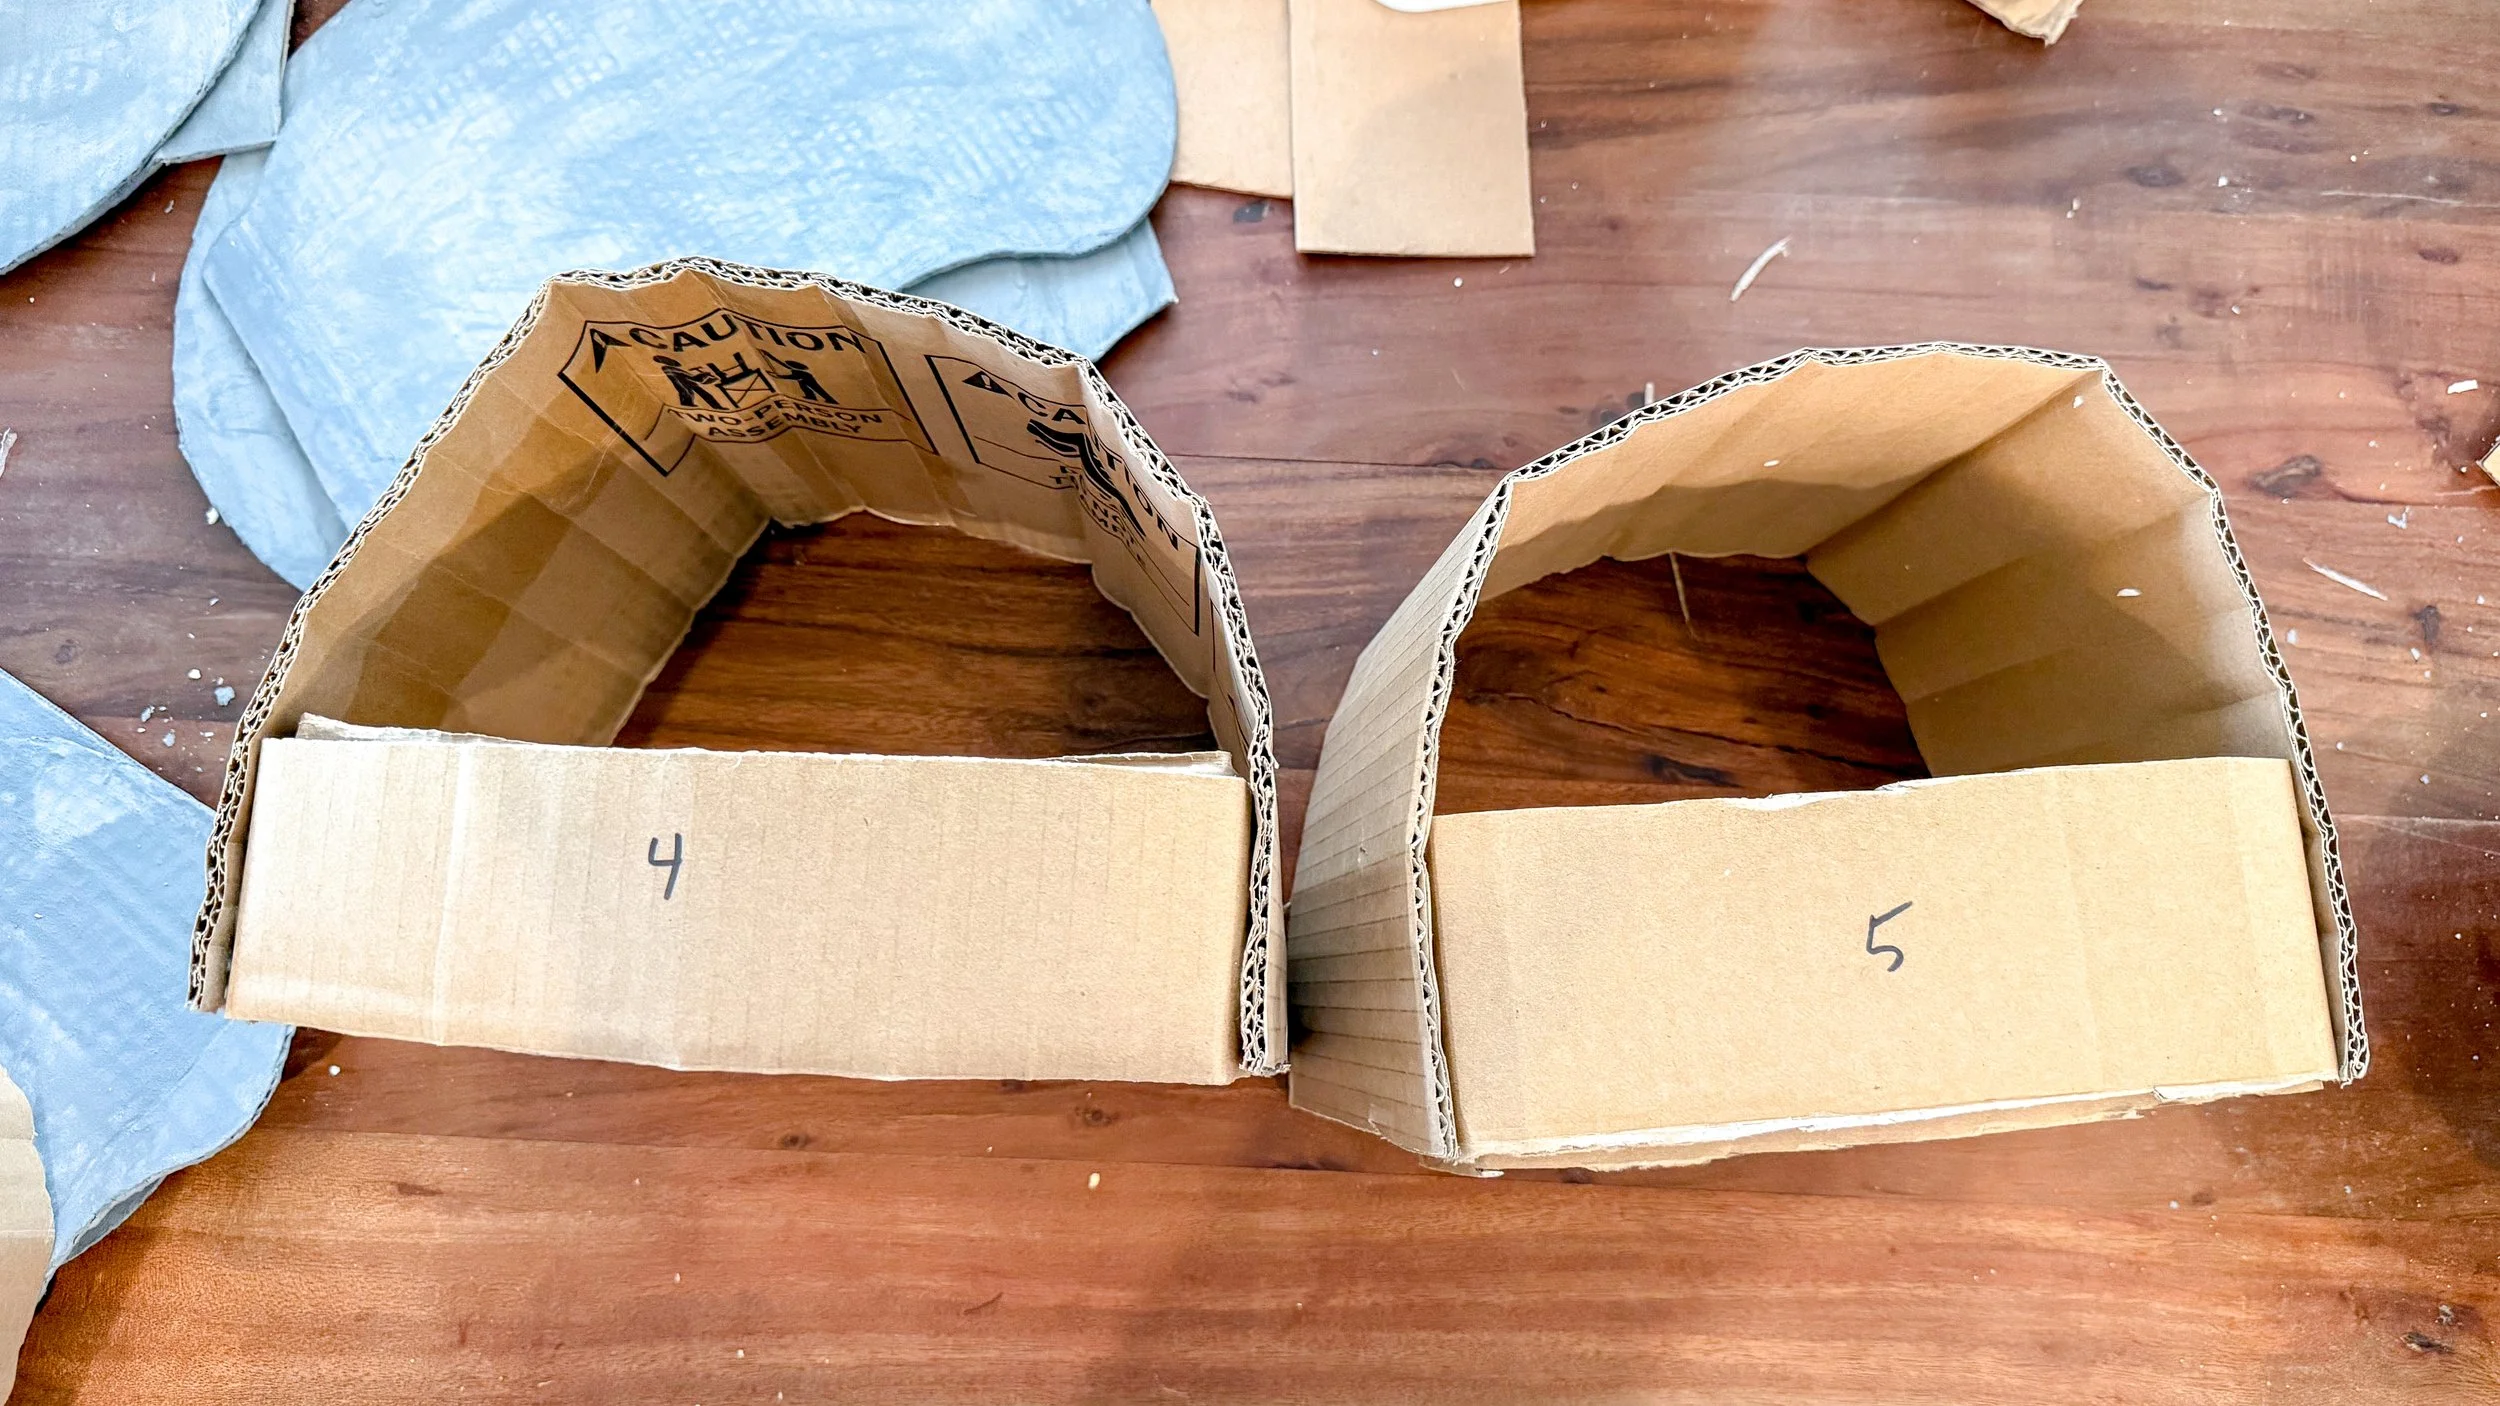
For the actual head pieces, I measured my daughter's head and used it as a guide. I took a piece of cardboard and put it over the top of her head, shoulder to shoulder. I did a few different sizes and widths because elementary kids differ in sizes, some more than others. I took 3 ft long strips, made some about 18 inches wide and others were about 24 inches wide. I made sure that when I cut the strips, I cut in a way that made it easy for the cardboard to be rolled which is critical for the head piece as it needs to arch over the head. I added a strip of cardboard across the front, creating the attaching point of the trunk. I used hot glue to attach the ears and bent the very edge pieces so they could be attached. I found that construction grade hot glue worked so much better than regular hot glue.
One of the things that I noticed when I was doing my prototype was that if I just attached the ears and did nothing else, they flopped forward, which looked terrible. So I needed a piece in the back, not only to secure the entire headpiece like a helmet, but also to keep the ears from flopping forward. I took another strip of cardboard, hot glued it to one ear, let that cool, and then took it over to the other ear and did the same thing. I bent the cardboard along the helmet so that it was contoured to it, and then I just held everything in place until the glue had cooled. Binder clips also came in clutch by holding everything tougher while it dried. When the ears were attached, I decided which trunk would go with which helmet, because each helmet and trunk was a different size and I needed them to blend cohesively together. I labeled all of them so that I was able to easily match the pairs when securing everything. In order to get the same texture that I got on the ears and trunk, I took the paste and painted it all over this helmet. Again, doing this in steps so I didn't have dragging ears and a ton of wet cardboard was critical. I also added some paste at the seam where the ears met the helmet. While I think it looked good, practically it didn't work very well because it actually kind of ate at the glue which turned into a problem I had to fix later on.
Cardboard Elephant Heads | Finishing Work
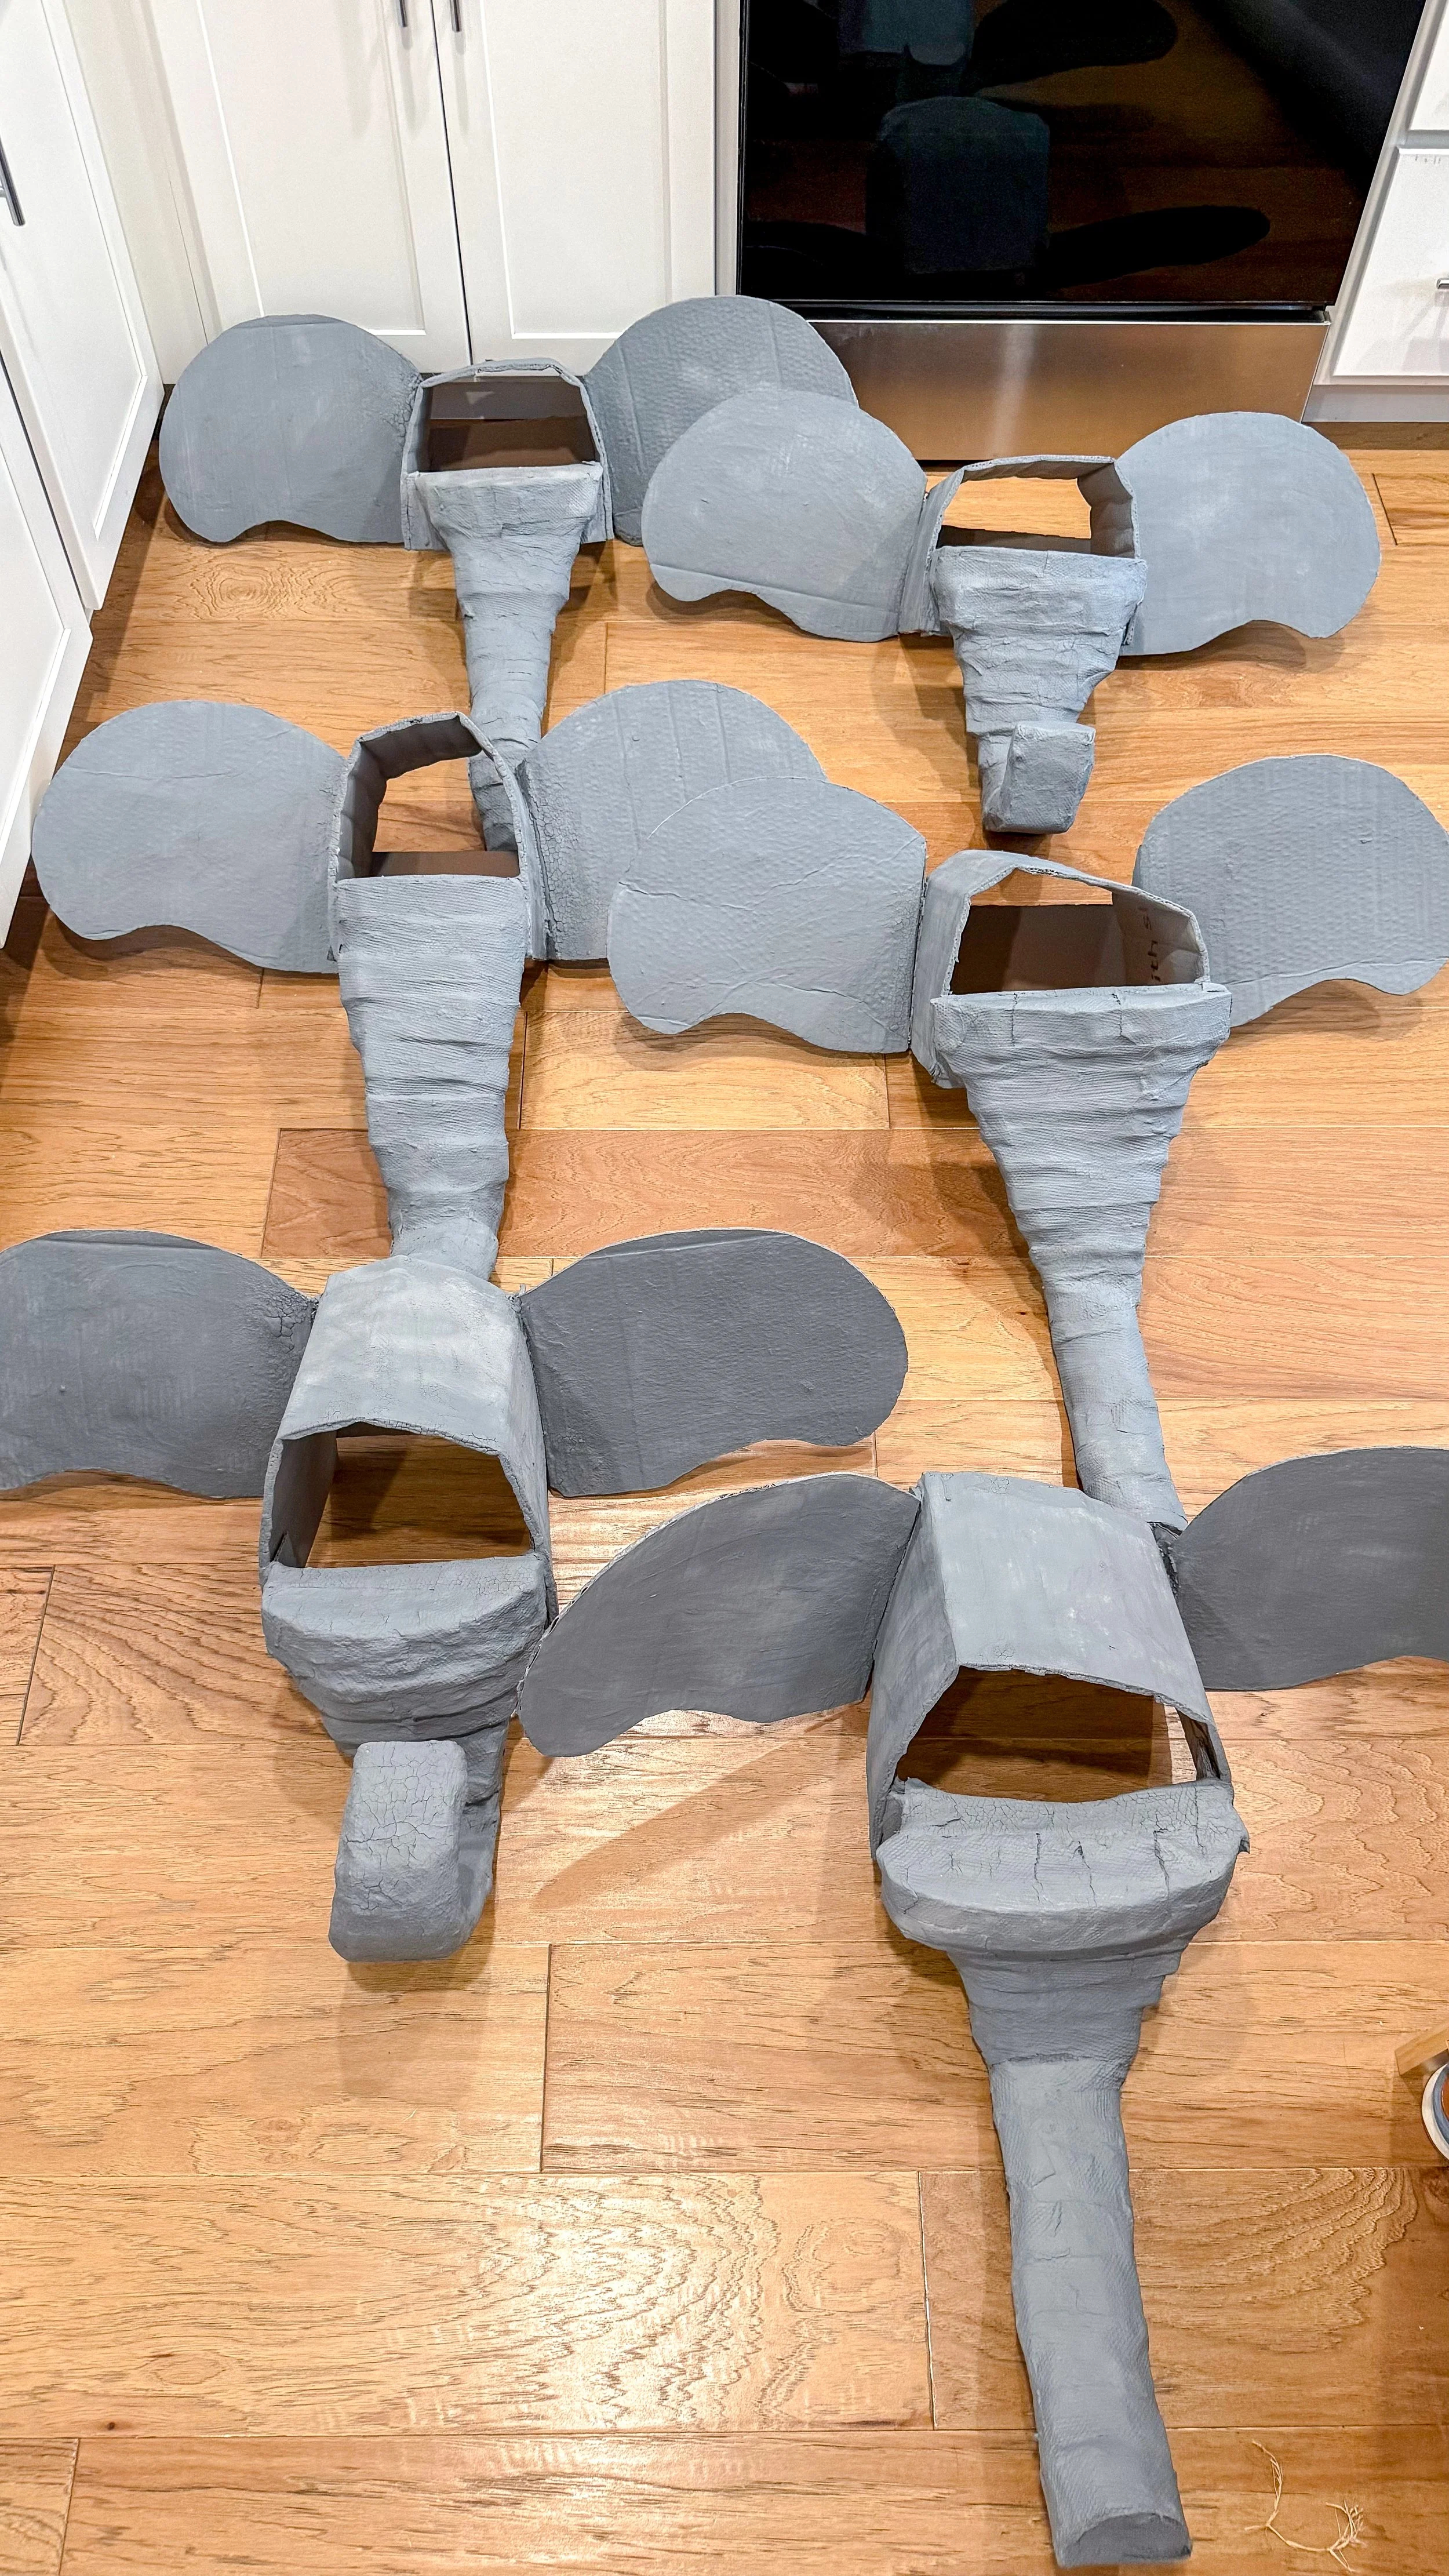
Once the paste was dry on the helmets, I went in with the matte spray paint primer again and painted everything. I did the extra step of spraying into the helmet on the inside a little bit just to make sure that if there were any inside views of the helmet, it still looked finished. When they were all dry, it was time to attach the trunks to the helmets. I started off by putting glue on the front of the helmet and then putting the trunk on, but that technique didn't work very well. Instead, I switched to putting the glue on the trunk and then putting it on the helmet and holding it there while it dried. I assumed that this would be good and I would be done. Unfortunately, my perfectionism snuck in and I found that I didn't like seeing the seams. So I made some more paste and I ripped up some more paper towels, and covered up all the places where the trunk met the front of the helmet. It wasn't a necessary step, but I liked the final product much better this way. Once everything was dry, again, I sprayed it all with the paint and primer so that it looked seamless. I ended up with 6 unique elephant heads and they were a huge hit!
This was such a fun project and I love that the heads made it possible to see the kids faces while they performed. I always love doing stuff for the musical at my daughter's school and love watching her and all of the cute kids perform even more! Hopefully this helps you with your next costume design, I'm sure it can be adapted to other animals too so let me see what you guys create!